Consumer Electronics
•04 min read

<p>Danger can overpower you at any time and your voice will not be enough in such situations to get the required aid. The amazing new <strong>Juvo PSB01 Personal Alarm</strong> is crafted for all ages and is a necessary precaution from all kinds of danger. It rings a very loud alarm at 120 dB as well as flashes the torch to warn people nearby about a danger. Whether you have a medical emergency or you are attacked by predators your voice may not be heard but this alarm will be enough to deter attackers or draw attention of people close by to give you the immediate assistance required.</p> <p><strong>Extremely Easy To Use</strong></p> <p>The <strong>Juvo PSB01 Personal Alarm</strong> is small and portable, can be attacked to even a keychain if you want. To start the siren all you need to do is separate or pull the metal key chain from the main black unit. The siren may go on for 1 1/2 hours in case nobody heard it in the first minutes. This is very important for girls returning home alone at night as it acts as a security anti-attack panic alarm that is sure to scare off a molester. Its easy portability accentuates its use.</p> <p><strong>Lights Your Way</strong></p> <p>The little and portable <strong>Juvo PSB01 Personal Alarm</strong> also features a small LED torch that helps you find your way in the dark. Don’t be scared of dark alleys when you have this with you because it is equipped to save you from all dangers.</p>
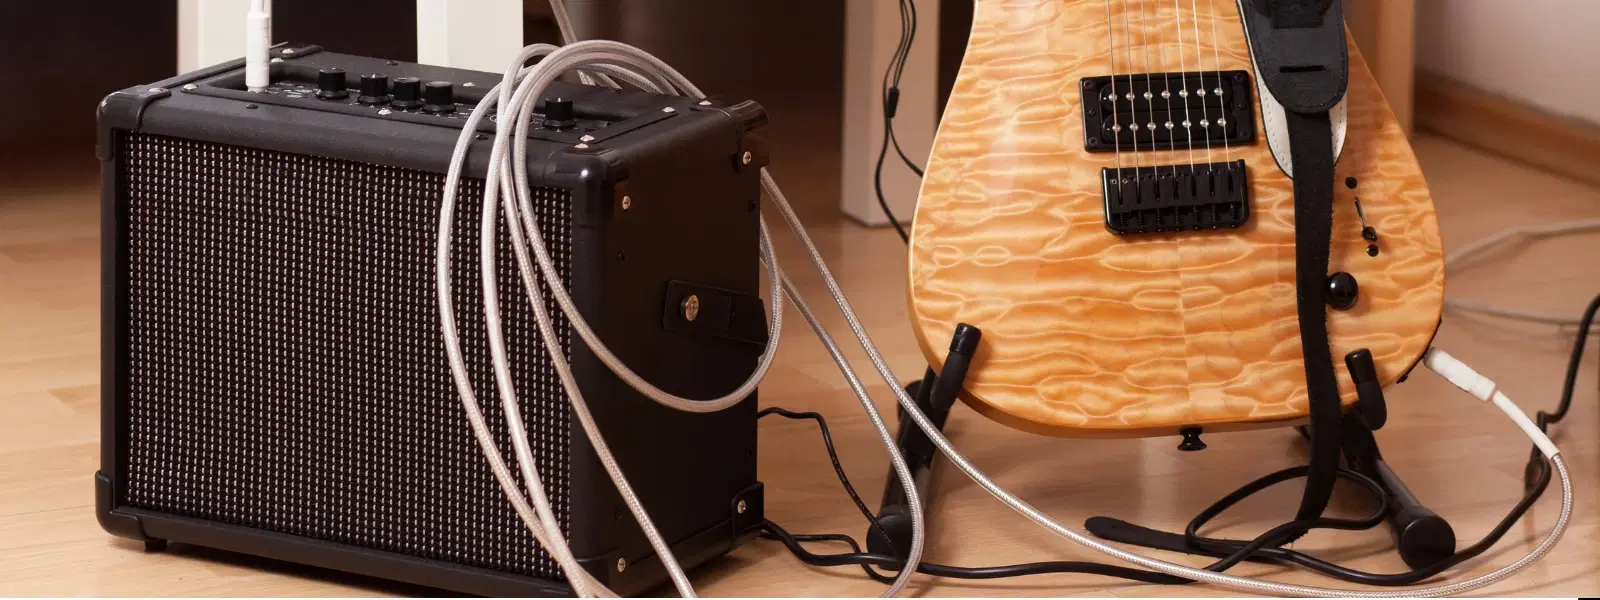
Imagine turning a simple USB connection into a powerful audio amplifier that delivers crystal-clear sound right from your home. This DIY electronics project allows you to explore the exciting world of audio innovation while keeping costs down and customising your listening experience. When you purchase your DIY components from Tata Neu, you not only invest in quality but also earn NeuCoins and enjoy expert guidance and express delivery, ensuring a seamless shopping experience. In this guide, you will learn how to make a USB amplifier at home through a detailed, step-by-step process that covers everything from understanding the basic concepts to assembling and testing your custom amplifier circuit.
A USB amplifier is a compact device that boosts the sound signals using USB power. It brings affordable audio enhancement to your setups, making it a favourite project for tech enthusiasts and DIY electronics fans. Whether you want to upgrade your portable audio system or experiment with custom amplifier designs, the fundamentals remain the same—a simple circuit that amplifies the audio signals coming from your device. This guide shows you how to build a DIY USB amplifier that functions as a homemade audio amplifier, combining both affordability and custom performance.
Building your own amplifier opens up a world of benefits. With a homemade audio amplifier, you enjoy significant cost savings, the thrill of creation and personalisation, and a deeper understanding of how circuits work. Instead of relying solely on ready-made commercial gadgets, you can tailor every aspect to suit your needs, ensuring a portable and low-cost amplifier project that fits perfectly into your tech lifestyle.
When planning your DIY USB amplifier, you will need a range of components like resistors, capacitors, transistors, USB connectors, and audio jacks. These parts are widely available and affordable, allowing you to source them with ease. Whether you are a seasoned DIY expert or trying out a homemade project for the first time, these components form the backbone of your custom amplifier for USB usage.
To complete your project successfully, you should have basic tools on hand. These include soldering equipment, a multimeter for testing, wire cutters, and a breadboard for circuit assembly. Beginners should look for starter kits that include these essentials, ensuring that anyone can embark on this portable USB amplifier project with minimal investment.

<p><strong>Effortless Performance</strong><br /> <br /> The sabichi Mono 24cm Whisk is designed for smooth and efficient whisking. Its polished stainless-steel wires and narrow shape ensure even blending and make it ideal for small bowls or containers. From whipping meringues to beating eggs, this whisk brings ease to every task.<br /> <br /> <br /> <strong>Versatile Whisking Tool</strong><br /> <br /> Whether you're blending batters, keeping lumps out of sauces, or creating airy meringues, this 24cm whisk is up to the challenge. It’s a kitchen essential that adapts to various culinary needs with precision and consistency.<br /> <br /> <br /> <strong>Safe for All Cookware</strong><br /> <br /> The whisk is gentle on all surfaces, including non-stick, ceramic, and metal cookware. You can whisk worry-free without scratching or damaging your kitchenware. This ensures long-lasting durability for your pots and pans.<br /> <br /> <br /> <strong>Ergonomic Design</strong><br /> <br /> Featuring an innovative handle with a soft, comfortable grip, this whisk absorbs pressure for strain-free usage. Its contoured shape ensures a secure hold, even during prolonged whisking tasks, for an effortless cooking experience.<br /> <br /> <br /> <strong>Convenient Storage</strong><br /> <br /> Equipped with a handy hanging loop, the whisk offers easy storage. It’s always within reach while saving counter and drawer space, making it as practical as it is efficient.</p>
At the heart of every audio amplifier is a well-designed circuit. Understanding the principles of signal amplification and power flow is key. In a USB-powered amplifier, the USB connection not only powers the circuit but also supplies a steady voltage, making it simpler to design. Visualising simple circuit diagrams can help you understand the journey of the audio signal as it is enhanced by every component you add.
Every audio enthusiast has unique needs, so customising your circuit can add that extra personal touch. It is possible to tweak the design for higher power output or adjust compatibility with different devices. With a bit of experimentation, you can troubleshoot common issues such as signal noise or power fluctuations. This phase of circuit design is crucial in creating a reliable and efficient USB amplifier.
Before you begin soldering, spend some time organising and testing each component. Checking the functionality of resistors, capacitors, and transistors early on can prevent future headaches. Remember to adhere to safety precautions such as using the soldering iron carefully, working in a well-ventilated area, and following local electrical safety regulations to prevent accidents. We understand that starting your first electronics project can seem daunting, so please take safety precautions and proceed confidently.
Now comes the exciting part: assembling your amplifier. Start by laying out the circuit on your breadboard. Connect wires as per your circuit diagram and ensure that each joint is secure. Then, solder the components onto the board with precision. A clear layout can make your assembly process smooth, while diagrams or illustrations can assist in keeping track of wiring and connections. This step-by-step sequence is essential for building a reliable and functional amplifier for USB use.
Once your circuit is assembled, the next step is to test your work using a multimeter and an audio source. Begin by checking that each circuit connection is live and that there is minimal interference. Fine-tuning the circuit is often necessary for optimal performance. Through methodical testing, you can adjust elements such as voltage or the input signal, ensuring your amplifier delivers high-quality sound every time. We understand that troubleshooting can be challenging, but take it step by step and trust your efforts.
Pro Tip: Optimize Your Amplifier’s Performance
Did you know that using high-quality capacitors and transistors can significantly improve your amplifier’s sound clarity and durability? Investing in these components will ensure your DIY USB amplifier delivers professional-grade audio output.

<p>The <strong>Lyfro Battery Powered Disinfectant Solution Generator</strong> is non-toxic and has no side effects</p> <ul> <li><strong>Free of Chemical Residues</strong> makes it an eco-friendly, cost-effective disinfectant</li> <li><strong>Uses Electrolysis</strong> to produce natural powerful disinfectant</li> <li><strong>300 mAh Battery</strong> with USB recharging facility</li> </ul> <p>Buy <strong>Lyfro Battery Powered Disinfectant Solution Generator</strong> to experience its awesome usages. It is an ultra-portable non-toxic disinfectant maker. It comes with an electrolysed water generator. Useful to sterilize public places as well. Use <strong>Lyfro Battery Powered Disinfectant Solution Generator</strong> which allows you to create your own non-toxic disinfectant in just 3 minutes. Simply add salt and water together. Uses electrolysis to produce natural powerful disinfectants proven to be effective against bacteria, viruses, and mold.</p> <p>When you get <strong>Lyfro Battery Powered Disinfectant Solution Generator</strong> online, you also get an awesome eco-friendly, cost-effective disinfectant for your everyday life. It is equipped with a 300 mAh battery with USB recharging facility. It is usable at home, office, or in transit. It eliminates up to 99.9 percent pathogens. It is free of chemical residues. It is a self-made disinfectant.</p>
Once your basic amplifier is up and running, consider adding additional features. A volume control knob, LED indicators or even a custom casing not only enhances the usability of your device but also gives it a polished look. These extra touches make your DIY electronics audio project even more rewarding and tailored to your lifestyle.
No project is without its challenges. If you encounter issues like noise distortion or power fluctuations, there are practical steps you can take. Double-check your circuit connections, and if necessary, replace any components that look faulty. Regular maintenance of your amplifier can extend its life and deliver a steady performance, ensuring that your custom amplifier for USB remains a reliable asset for all your audio experiences.
Start by gathering basic components like resistors, capacitors, and transistors, then design a simple circuit that amplifies audio signals. Follow step-by-step instructions to assemble and test the circuit.
You can repurpose a mobile charger as a power source for your amplifier by connecting it to the circuit using a USB connector. Ensure the charger provides sufficient voltage and current for the amplifier.
Build an amplifier using readily available electronic components and connect it to your audio source. This DIY approach allows you to amplify sound effectively and affordably.
Electronic components like transistors and operational amplifiers can be used to design circuits that amplify audio signals. Additionally, USB power sources, speakers, and audio jacks are key elements in amplifier setups.
Building a USB amplifier at home is not only a rewarding project but also a fantastic way to learn the basics of audio circuit design and DIY electronics. You have discovered how each step, from gathering materials to testing the final output, plays a crucial role in creating a reliable and personalised audio experience. This step-by-step guide has introduced you to making amplifiers at home with simple components, proving that innovation is within reach even for hobbyists and young tech enthusiasts. Explore Tata Neu’s wide range of DIY electronics components to make your projects even more rewarding.
