Consumer Electronics
•04 min read

<p>Danger can overpower you at any time and your voice will not be enough in such situations to get the required aid. The amazing new <strong>Juvo PSB01 Personal Alarm</strong> is crafted for all ages and is a necessary precaution from all kinds of danger. It rings a very loud alarm at 120 dB as well as flashes the torch to warn people nearby about a danger. Whether you have a medical emergency or you are attacked by predators your voice may not be heard but this alarm will be enough to deter attackers or draw attention of people close by to give you the immediate assistance required.</p> <p><strong>Extremely Easy To Use</strong></p> <p>The <strong>Juvo PSB01 Personal Alarm</strong> is small and portable, can be attacked to even a keychain if you want. To start the siren all you need to do is separate or pull the metal key chain from the main black unit. The siren may go on for 1 1/2 hours in case nobody heard it in the first minutes. This is very important for girls returning home alone at night as it acts as a security anti-attack panic alarm that is sure to scare off a molester. Its easy portability accentuates its use.</p> <p><strong>Lights Your Way</strong></p> <p>The little and portable <strong>Juvo PSB01 Personal Alarm</strong> also features a small LED torch that helps you find your way in the dark. Don’t be scared of dark alleys when you have this with you because it is equipped to save you from all dangers.</p>
How to install windows from usb bios – Installing Windows using a USB drive is one of the most efficient ways to set up your operating system, especially when your device lacks a CD/DVD drive. At Tata Neu, expert technical guides come with added rewards—earn NeuCoins on eligible purchases and enjoy express delivery for your tech essentials. This comprehensive guide walks you through the process, ensuring you feel confident in creating a bootable USB, configuring your BIOS settings, and overcoming common issues during installation.
The USB installation method is highly valued for its speed, portability, and compatibility with modern devices. Whether you don’t have an optical drive or are simply looking to reinstall Windows with a fresh start, using a bootable USB drive offers an efficient solution. This process minimizes delays and can help resolve boot issues while giving you more control over your system setup.
Before you begin, ensure you have the following essentials: a USB drive with at least 8GB of storage, a secure Windows ISO file for Windows 10 or 11, and a PC that supports the Windows version you intend to install. Being fully prepared not only speeds up the process but also helps to avoid any unexpected surprises along the way.
Start by formatting your USB drive appropriately. Tools like Microsoft’s Media Creation Tool or third-party utilities such as Rufus are popular choices to create a bootable USB. Once you select your tool, carefully follow the instructions to transfer the Windows ISO onto the drive. These steps reflect the current Windows installation protocols as of today. Once completed, check that the USB drive is correctly configured to be bootable. This verification step is crucial for a seamless BIOS installation process.
Occasionally, you might face challenges such as the drive not being detected or an error suggesting your ISO file might be corrupted. In these cases, double check your USB drive for compatibility and ensure that your ISO source is secure. A helpful insight: verifying that your USB drive works well with your PC’s BIOS version can save you a lot of trouble later on.
Pro Tip: Speed Up Your Bootable USB Creation
Consider formatting your USB drive to NTFS instead of FAT32. This small adjustment can improve compatibility and speed when transferring large Windows installation files. Additionally, ensuring your USB drive is set as 'Active' during partitioning can help you avoid boot errors in the BIOS.

<p><strong>Effortless Performance</strong><br /> <br /> The sabichi Mono 24cm Whisk is designed for smooth and efficient whisking. Its polished stainless-steel wires and narrow shape ensure even blending and make it ideal for small bowls or containers. From whipping meringues to beating eggs, this whisk brings ease to every task.<br /> <br /> <br /> <strong>Versatile Whisking Tool</strong><br /> <br /> Whether you're blending batters, keeping lumps out of sauces, or creating airy meringues, this 24cm whisk is up to the challenge. It’s a kitchen essential that adapts to various culinary needs with precision and consistency.<br /> <br /> <br /> <strong>Safe for All Cookware</strong><br /> <br /> The whisk is gentle on all surfaces, including non-stick, ceramic, and metal cookware. You can whisk worry-free without scratching or damaging your kitchenware. This ensures long-lasting durability for your pots and pans.<br /> <br /> <br /> <strong>Ergonomic Design</strong><br /> <br /> Featuring an innovative handle with a soft, comfortable grip, this whisk absorbs pressure for strain-free usage. Its contoured shape ensures a secure hold, even during prolonged whisking tasks, for an effortless cooking experience.<br /> <br /> <br /> <strong>Convenient Storage</strong><br /> <br /> Equipped with a handy hanging loop, the whisk offers easy storage. It’s always within reach while saving counter and drawer space, making it as practical as it is efficient.</p>
Accessing the BIOS (Basic Input/Output System) is the first step towards successful installation. Depending on your PC model, key combinations such as F2, DEL, or ESC are typically used to enter the BIOS setup. While the process may vary slightly between brands like Dell, HP, ASUS, or Lenovo, the goal is the same: to allow you to change the boot prioritisation settings.
Once inside the BIOS, navigate to the boot menu and locate the boot priority list. Here, you must choose your USB drive as the primary boot device. After making this change, remember to save your settings before exiting BIOS. We understand that BIOS configurations can be daunting, but our guide and the trusted support from Tata Neu make the process simpler. If your PC gives you a message like “USB not recognised” or “Invalid boot device,” this is often right in the area of boot priority settings.
If you encounter persistent issues, such as your USB not being recognised or errors emerging during boot, it might be worth checking your Secure Boot configuration. Some systems require Secure Boot to be disabled temporarily for a successful installation. A bit of patience here ensures a smoother transition.
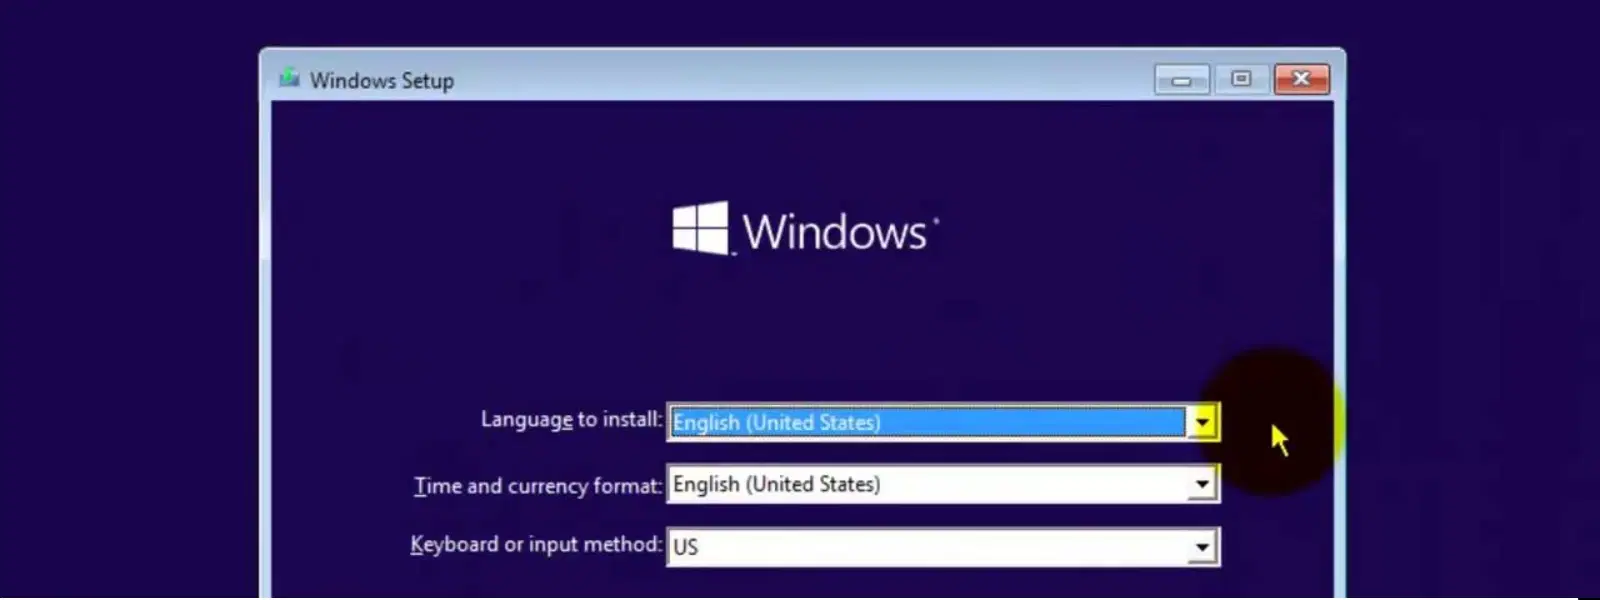
With your bootable USB created and your BIOS configured, plug in the USB drive and restart your PC. The Windows setup wizard should commence automatically. Ensure you have downloaded the latest Windows installation media before proceeding. Follow the on-screen instructions to partition your drive, select the appropriate installation target, and proceed with the installation. Once Windows is installed, perform any necessary post-installation updates to fully optimise your operating system.
During setup, you might face issues such as receiving a message that Windows cannot be installed on a specific drive or missing drivers. Often, these issues can be resolved by double checking your disk partition settings and ensuring that all necessary drivers are available. A steady approach to troubleshooting will ensure your Windows installation process is smooth and efficient.

Retrieving data. Wait a few seconds and try to cut or copy again.
If your system reports that the USB drive isn’t booting or displays a 'No bootable device found' error, consider recreating the bootable USB. Updating your BIOS firmware might also help resolve these issues, thus ensuring a smoother boot process from your USB drive.
Should you face challenges such as the installation freezing or displaying error codes during setup, it is helpful to keep a copy of essential Windows drivers handy. This precaution helps in resolving hardware compatibility issues quickly and restores smooth functioning during your operating system installation.
Access the BIOS, set your USB drive as the primary boot device, then follow the Windows installation wizard after restarting your PC.
Yes, you can install Windows from BIOS by booting from a properly configured bootable USB drive.
You don’t create a bootable USB from BIOS. Instead, use tools such as Microsoft’s Media Creation Tool or Rufus to make your USB bootable, and then configure the BIOS to boot from it.
Download the Windows 11 ISO file, create a bootable USB, adjust the BIOS settings to boot from USB, and then follow the Windows setup wizard to complete the installation.
At Tata Neu, we prioritise a seamless customer experience. Earn NeuCoins on eligible purchases, enjoy express delivery for orders placed before 6 PM, and benefit from expert after-sales support. These advantages make Tata Neu the trusted choice for all your tech essentials.
This step-by-step guide shows that installing Windows via a USB drive using BIOS settings is a straightforward process when done correctly. By preparing a bootable USB, configuring your BIOS, and following clear instructions, you can make your new system setup efficient and hassle-free. Explore more consumer electronics insights to optimise your tech usage and enjoy the trust and convenience that comes with a well-supported platform.
