
Consumer Electronics
•04 min read

<p>Danger can overpower you at any time and your voice will not be enough in such situations to get the required aid. The amazing new <strong>Juvo PSB01 Personal Alarm</strong> is crafted for all ages and is a necessary precaution from all kinds of danger. It rings a very loud alarm at 120 dB as well as flashes the torch to warn people nearby about a danger. Whether you have a medical emergency or you are attacked by predators your voice may not be heard but this alarm will be enough to deter attackers or draw attention of people close by to give you the immediate assistance required.</p> <p><strong>Extremely Easy To Use</strong></p> <p>The <strong>Juvo PSB01 Personal Alarm</strong> is small and portable, can be attacked to even a keychain if you want. To start the siren all you need to do is separate or pull the metal key chain from the main black unit. The siren may go on for 1 1/2 hours in case nobody heard it in the first minutes. This is very important for girls returning home alone at night as it acts as a security anti-attack panic alarm that is sure to scare off a molester. Its easy portability accentuates its use.</p> <p><strong>Lights Your Way</strong></p> <p>The little and portable <strong>Juvo PSB01 Personal Alarm</strong> also features a small LED torch that helps you find your way in the dark. Don’t be scared of dark alleys when you have this with you because it is equipped to save you from all dangers.</p>
Ever tried connecting your Mac to an external monitor, only to be met with a blank screen or confusing settings? You are not alone. This checklist will simplify the process for you, whether for productivity, entertainment, or creative work. Here, you will learn step-by-step instructions on how to connect your Mac to a monitor, including troubleshooting tips, setup guides, and optimal display settings.
Before you begin, identify your Mac model and check your monitor specifications. It is important to verify the supported connection types such as HDMI, USB-C, or Thunderbolt. Also, ensure that the resolution and refresh rate of your monitor are compatible with your Mac. These steps will help you to connect Mac to external display without any hitches.
Next, gather all necessary accessories. Using the right cables and adapters can make a big difference. For instance, if you plan to use a Mac USB-C to monitor connection, make sure you have a quality adapter for monitor use. High-quality cables for Mac HDMI connection or Thunderbolt will provide a secure connection, ensuring a seamless Mac monitor setup guide experience.
Begin by connecting the cable securely. Depending on your accessory, plug in your HDMI cable or USB-C connector into your Mac. Ensure that the monitor is powered on and set to the correct input source. Following these steps for a Mac HDMI connection ensures that you can easily connect your Mac to an external display.
If you prefer a wire-free option, consider using AirPlay to enable MacBook screen mirroring. Simply open the Control Centre and select your monitor from available devices. This option is ideal for quick setups and presentations, offering a convenient pathway to connect Mac to external display without physical cables.
After you have made the physical connection, it is time to adjust the settings. Navigate to System Settings > Displays on your Mac. Here, you can explore various options such as screen resolution, scaling, and refresh rate to ensure optimum performance. These Mac display settings are essential for a clear and customised viewing experience.
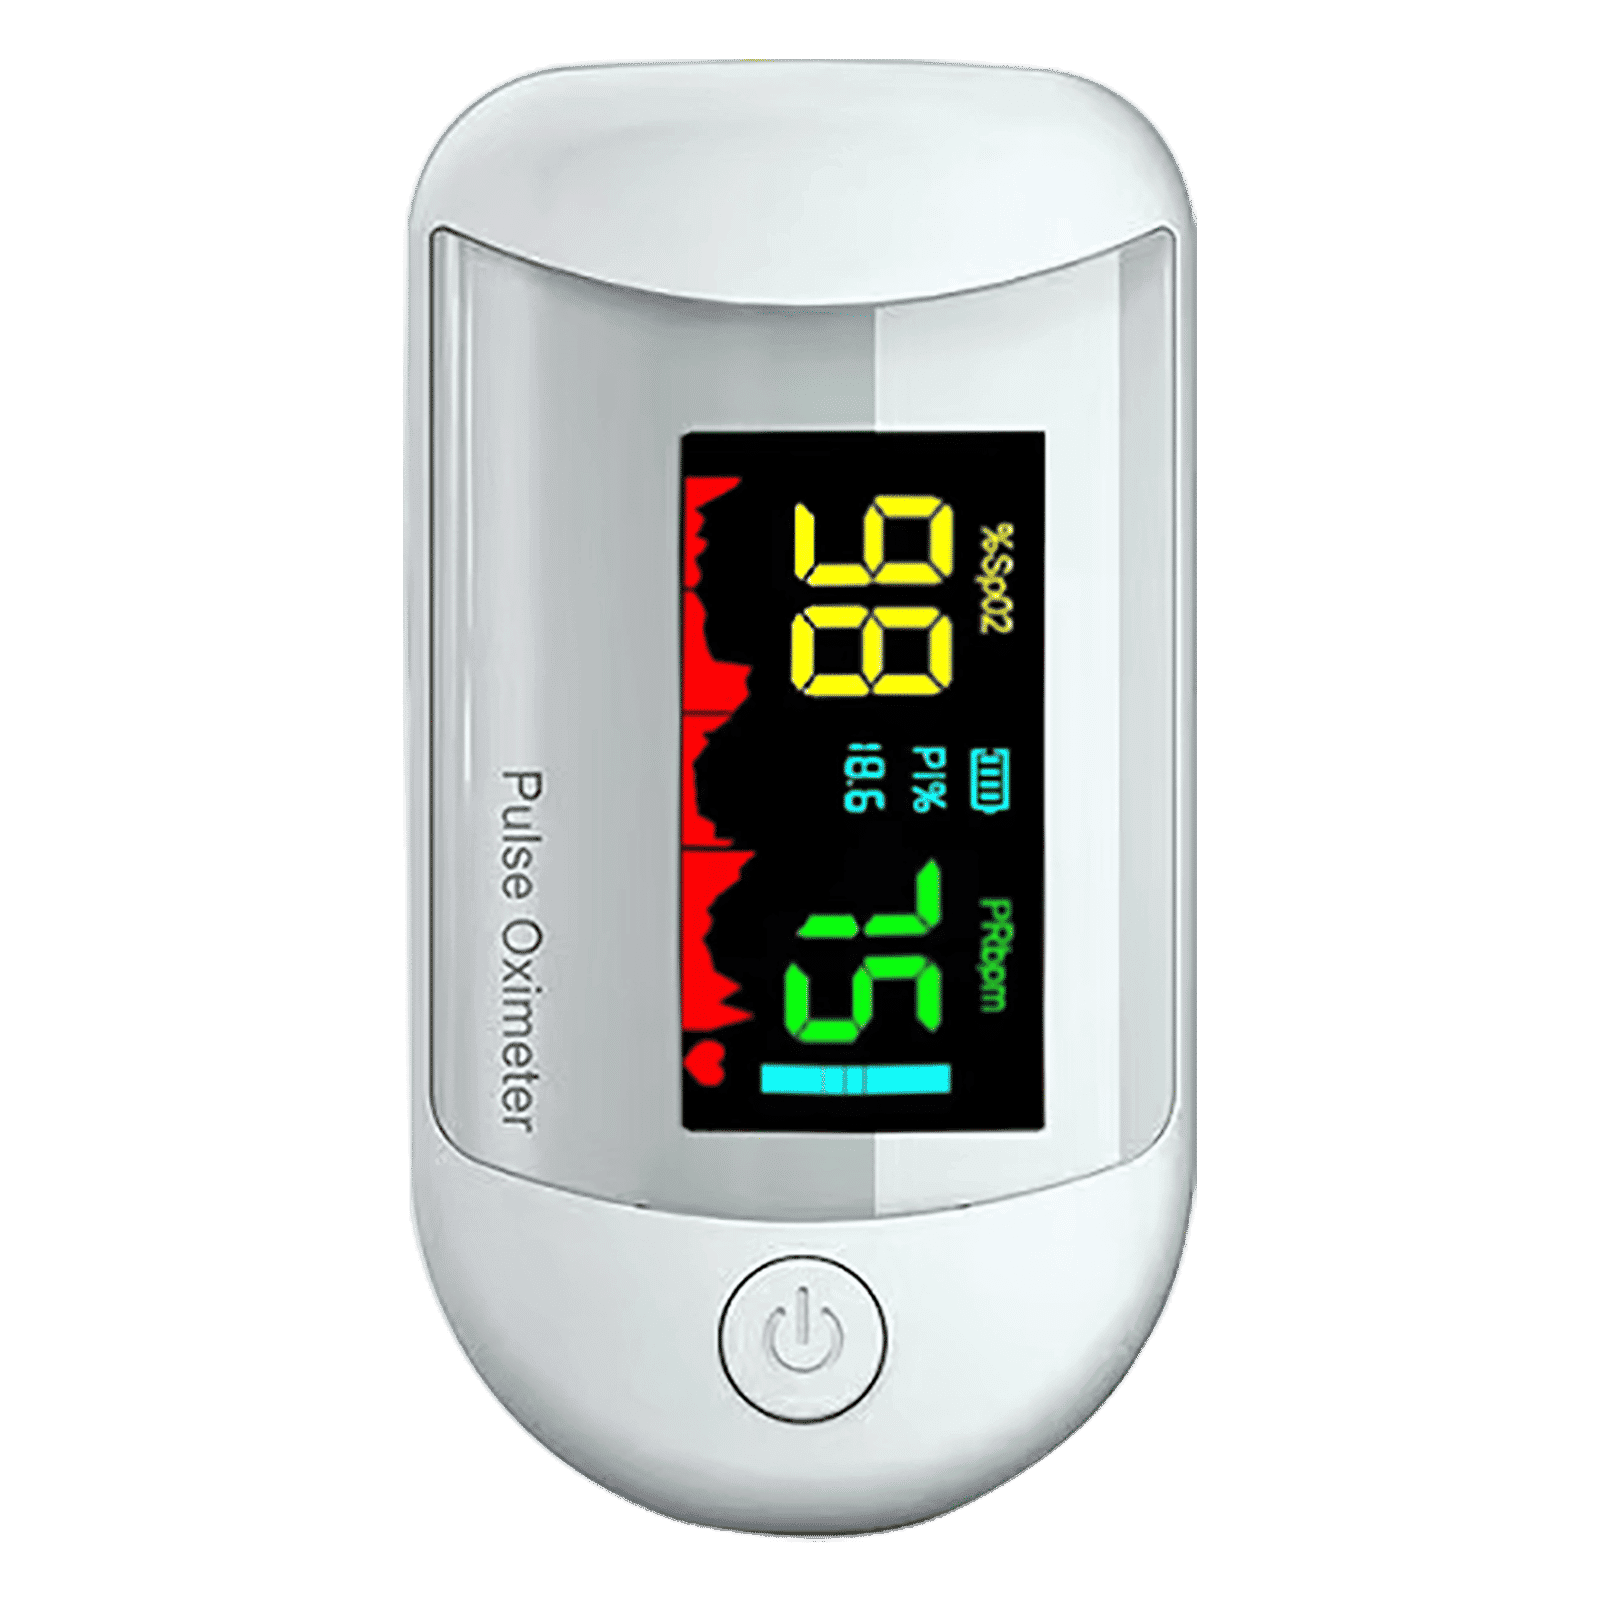
<p><strong>Why buy iGear Health Digital Pulse Monitor/Oximeter</strong></p> <p> </p> <ul> <li><strong>Fast, Reliable Measurement</strong> of Oxygen Saturation (SpO2) and Pulse (PR bpm) within 5-8 seconds</li> <li><strong>Perfusion Index</strong> of 0.3% measures even the weakest of the Pulse</li> <li><strong>Auto Power Off</strong> when not in use</li> <li><strong>4 Direction Display</strong> and Multi-coloured Display for ease of reading</li> <li><strong>Infrared Sensor</strong> for seamless operation</li> </ul> <p> </p> <p>Stay healthy and fit by keeping a regular check of your oxygen level by bringing home the <strong>iGear Health Digital Pulse Monitor/Oximeter</strong>. Although, the Blood pressure monitor may be the most recognizable medical tool in the market, but Pulse Oximeter is a close second for the most-used medical device. Being fast and reliable, the <strong>iGear Health Digital Pulse Monitor/Oximeter</strong> measures the amount of oxygenated blood (Spo2) in your body, giving medical professionals an idea of how much oxygen your body is carrying to vital organs and tissues. It measures Oxygen Saturation (SpO2) and Pulse (PR bpm) within 5-8 seconds. It comes with a measuring range of 0 – 100% (Oxygen Saturation) and 25 – 250 bpm (Pulse Rate). It has accuracy in readings of Oxygen Concentration in the Blood range 0-100% (+/- 2%) and Pulse rate range 25-250 bpm (+/- 2 bpm). It comes with a Perfusion Index of 0.3%, which can measure even the weakest of the Pulse.</p> <p> </p> <p>Having the <strong>iGear Health Digital Pulse Monitor/Oximeter</strong> at home allows the patients to monitor vital signs with an extra layer. These tools give you a better view of your health and allow you to coordinate with your healthcare provider. If you have a condition that affects your blood oxygen levels -think sleep apnea, chronic obstructive pulmonary disease (COPD), asthma, lung cancer, or heart failure, among many other conditions you may benefit from an at-home Pulse Oximeter. It comes with Infrared Sensor that seamlessly records all the readings. The One-click measurement of the device makes it convenient to operate. Viewing the readings will no longer be a struggle. Thanks to the 4 direction display and multi-colored display that makes viewing the reading simple and easy. Being battery operated, it offers long-lasting usage having an auto power-off feature. So, wait no more! Order the <strong>iGear Health Digital Pulse Monitor/Oximeter</strong> online, right away!</p>
Setting up your Mac screen resolution setup correctly can enhance clarity and performance. Use the ‘Scaled’ option to adjust the resolution and see which setting works best. Whether configuring an external monitor for Mac or setting up a Mac dual monitor setup, these adjustments are key for balancing quality and productivity.
You can choose either to mirror your MacBook screen or to extend your display. For presentations, mirroring is an excellent choice; for multitasking, extending the display helps improve workflow. This flexibility in MacBook screen mirroring ensures that you use the right setting for every occasion.
Pro Tip: Optimize Your Workspace with Dual Monitors
Did you know? Setting up a Mac dual monitor configuration can boost your efficiency significantly. Use extended displays for multitasking or mirrored screens for presentations, and tailor your workspace to suit creative work or productivity needs.
If the monitor fails to detect your Mac, first check the cable connections. Ensure that all adapters are correctly seated and that the monitor has been powered on for a few moments. A quick restart of both devices often resolves the issue when attempting to connect Mac to external display.
For instances of flickering or low-quality visuals, verify that your macOS is up-to-date and that the monitor firmware is current. This step will assist in adjusting your Mac screen resolution setup, providing a smoother visual experience.
Sometimes, issues occur due to a faulty adapter or cable. Inspect your accessories for any signs of wear or damage. If problems persist, consider using a trusted alternative. A reliable Mac adapter for monitor use or USB-C cable ensures your connection remains stable.

<p style="margin-left:0cm; margin-right:0cm">Keep away from breathing in harmful germs, dust and pollution by using the <strong>Arctic Fox N95 Gold Series</strong> <strong>Face Respirator Mask.</strong> The mask is designed specially ensuring that it fits comfortably on your face and covers all the essential parts of your face. The soft ear loops ensure the comfort-ability for longer use. It has a 3 mm foam material for comfort fit and air seal.</p> <p style="margin-left:0cm; margin-right:0cm">The <strong>Arctic Fox N95 Gold Series</strong> <strong>Face Respirator Mask</strong> is super breathable because of the comfortable fabric and is also splash resistant.</p> <p style="margin-left:0cm; margin-right:0cm">Whether you are travelling or for that matter, moving out of your house, wearing the <strong>Arctic Fox N95 Gold Series</strong> <strong>Face Respirator Mask </strong>will ensure security to your health by helping you keep the dust and germs out from inhaling it.</p>
For users seeking a more advanced configuration, setting up dual monitors can be especially beneficial. Arrange the displays ergonomically and configure the settings to extend your desktop. This Mac dual monitor setup can support enhanced productivity and streamlined workflow.
If you are in creative fields such as video editing, graphic design, or coding, calibrating your monitors can provide accurate colours and improved clarity. Experiment with advanced display modes and fine-tune your settings using the Mac monitor setup guide, ensuring that every detail meets your creative standards.
Plug the HDMI cable into your monitor and then into your MacBook with the appropriate adapter if needed. Afterwards, navigate to System Settings > Displays to finalise the connection.
Use AirPlay for a wireless connection. Make sure both devices are on the same Wi-Fi network, then select your monitor from the AirPlay options in the Control Centre.
Double-check that all cables are connected properly, the monitor is powered on, and that you have selected the correct input source. Restarting your Mac and monitor can also help resolve the issue.
Yes, USB-C cables are compatible with most modern monitors. Ensure your monitor supports USB-C input and that you are using a high-quality cable for the best performance.
Open System Settings > Displays and select your preferred resolution. The “Scaled” option allows for further customisation, ensuring your display is perfectly configured.
This checklist has guided you through preparing for the connection, setting up the physical and wireless connection, configuring your display settings, and troubleshooting common issues. By following these steps on how to connect mac to monitor, you can create a seamless and efficient workspace that supports both professional and creative endeavours. With Tata Neu, you also earn NeuCoins rewards and reap special benefits when purchasing tech products, allowing you to shop smartly while enjoying expert guidance with every step.
