
Consumer Electronics
•03 min read
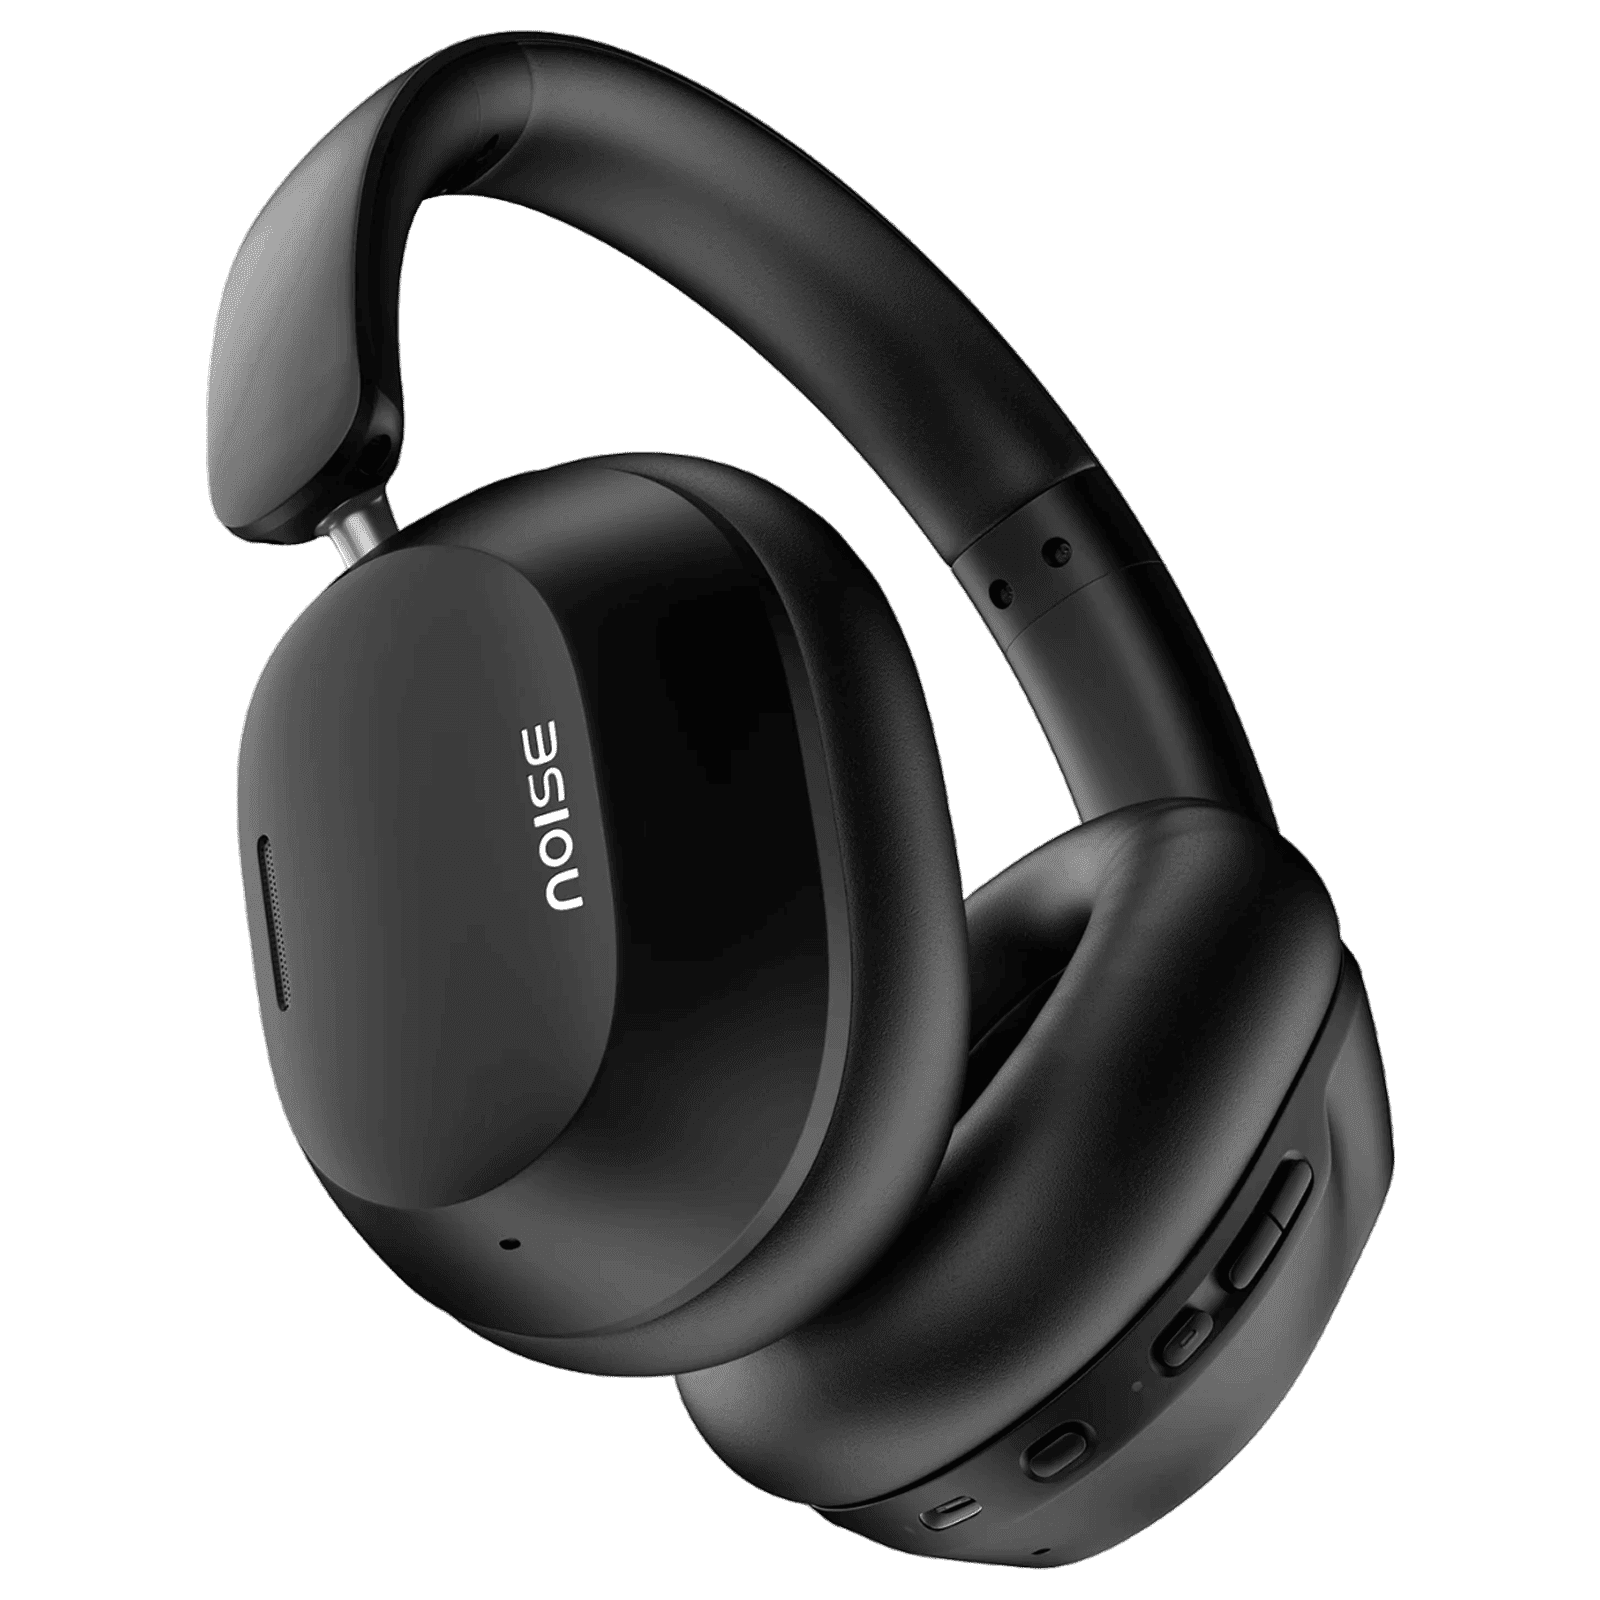
Buy noise Airwave Max 5 Bluetooth Headphone with Mic (Adaptive Hybrid ANC, On Ear, Carbon Black) online at best prices from Croma. Check product details, reviews & more. Shop now!
Ever struggled with resizing images on your Mac but didn’t know where to start? Resizing images on a Mac is a common task, yet many users face uncertainty about which tools and methods to use, especially when trying to achieve the perfect balance between quality and file size. In this guide, you will learn how to resize an image on Mac, covering everything from basic adjustments in Preview to advanced methods using Automator and third-party photo resizing tools. This comprehensive FAQ will help you understand the process and provide useful tips, ensuring your image resizing needs are met effectively.
Resizing an image on Mac refers to changing the dimensions of a picture whether you want to adjust the width, height, or both. Unlike cropping, which removes portions of an image, or compressing, which reduces file size without changing dimensions, resizing changes the overall size of your file. This is essential for ensuring images display correctly for web uploads, email attachments, or even creating wallpapers.
Resizing images on Mac helps in several ways. It saves storage space, optimises images for quicker uploads and email transfers, and ensures compatibility with various digital platforms. Many users find that resizing photos on Mac enhances the user experience when sharing images on social media or incorporating them in presentations or documents.
The Preview app on your Mac is a handy tool for basic image editing. To resize an image using Preview, simply open the image, go to Tools and select Adjust Size. Here, you can input your desired dimensions. The option to 'Resample image' plays a crucial role in maintaining the quality of the image during resizing. This feature adjusts the image data when changing dimensions, helping you to resize image on mac without sacrificing clarity.
If you need to resize more than one image at a time, Preview also supports batch processing. By selecting multiple images, opening them simultaneously, and navigating to Tools then Adjust Size, you can quickly resize photos on mac to maintain uniformity. This method is perfect for those who need mac image editing tips that save time while ensuring consistent results across multiple files.

Buy Electrolux UltimateHome 700 250W Cordless Dry Vacuum Cleaner with 5 Step Filtration System (Up to 50 Minutes Runtime, Walnut Brown) online at best prices from Croma. Check product details, reviews & more. Shop now!
Pro Tip: Maximise Image Quality While Resizing
Did you know? Using the 'Resample image' option in Preview ensures your resized images maintain their quality without pixelation. Always enable this feature when resizing for professional use.
Automator is another built-in tool that offers more advanced features for those who need to process numerous images simultaneously. With Automator, you can create custom workflows that automatically adjust image dimensions mac to suit your needs. This not only streamlines your tasks but also standardises image sizing across different projects.
For users who desire enhanced features and more control over image quality, third-party photo resizing tools on Mac are an excellent option. Applications like JPEGmini, Resize Sense, and similar tools provide detailed control over how to change image size mac and allow for bulk processing options that are perfect if you often need to resize pictures mac for multiple purposes.
When resizing, understanding resolution and DPI (dots per inch) is crucial. A high-resolution image resized properly will maintain its sharpness if the appropriate settings are used. Ensuring that the 'Resample image' option is enabled in Preview is key to mac preview resize image tasks. For best results, do not reduce the resolution drastically, especially for professional or print-quality work.
While image resizing focuses on changing the dimensions, compression is used to reduce file size. Knowing the difference is important: compressing an image is best for quick web uploads, whereas resizing is ideal for ensuring images fit specific digital spaces or requirements. Use the right photo resizing tools mac to achieve your desired balance between size and quality.

<p>Danger can overpower you at any time and your voice will not be enough in such situations to get the required aid. The amazing new <strong>Juvo PSB01 Personal Alarm</strong> is crafted for all ages and is a necessary precaution from all kinds of danger. It rings a very loud alarm at 120 dB as well as flashes the torch to warn people nearby about a danger. Whether you have a medical emergency or you are attacked by predators your voice may not be heard but this alarm will be enough to deter attackers or draw attention of people close by to give you the immediate assistance required.</p> <p><strong>Extremely Easy To Use</strong></p> <p>The <strong>Juvo PSB01 Personal Alarm</strong> is small and portable, can be attacked to even a keychain if you want. To start the siren all you need to do is separate or pull the metal key chain from the main black unit. The siren may go on for 1 1/2 hours in case nobody heard it in the first minutes. This is very important for girls returning home alone at night as it acts as a security anti-attack panic alarm that is sure to scare off a molester. Its easy portability accentuates its use.</p> <p><strong>Lights Your Way</strong></p> <p>The little and portable <strong>Juvo PSB01 Personal Alarm</strong> also features a small LED torch that helps you find your way in the dark. Don’t be scared of dark alleys when you have this with you because it is equipped to save you from all dangers.</p>
Open the image in Preview, go to Tools > Adjust Size, and enter the desired dimensions.
Yes, you can select multiple images in Preview, open them together, and use the Adjust Size option to perform batch resizing.
Several apps are available. Some excel in optimising image quality, while others are ideal for batch processes. Choose the one that fits your specific needs.
Ensure that the 'Resample image' option is enabled in Preview and avoid dropping the resolution below recommended levels.
No, the Photos app does not support resizing. It’s recommended to use Preview or other dedicated tools for this purpose.
Resizing images on Mac doesn’t have to be complicated. Whether you’re applying basic techniques in Preview, utilising Automator for efficient batch processes, or exploring advanced third-party applications, the tools available on your Mac cater to a variety of needs. The ease and convenience with which these tasks can be performed reflect the same user-focused ethos we cherish at Tata Neu. Much like how our platform offers NeuCoin rewards and special benefits to reward your loyalty, mastering these image resizing techniques can transform a simple digital task into an act of smart, efficient productivity. As you continue to experiment and perfect your image editing skills, you ensure your digital presentation remains sharp and professional – an essential quality in today’s visual world.
