Consumer Electronics
•03 min read

<p><b>HEUV Technology</b><br/><br/>Thanks to the HEUV technology, the SVARAS Home X2 Pro UV Steriliser effectively targets and eliminates a wide range of viruses and bacteria, including those responsible for illnesses such as the coronavirus. As a result, you can have peace of mind knowing that you can effectively protect yourself and your family from potential health threats.<br/><br/><br/><b>Enhanced Sterilisation</b><br/><br/>This rechargeable UV steriliser provides optimal sterilisation capabilities, which eliminates harmful germs. This high level of effectiveness makes it an ideal choice for homes, offices, and shops, ensuring that surfaces remain clean and safe. Thus, you can trust this steriliser to protect your health and the health of your loved ones by efficiently disinfecting various surfaces.<br/><br/><br/><b>User-Friendly Functionality</b><br/><br/>This home steriliser boasts convenient features that enhance its usability. It includes a voice alarm that signals when the sterilisation process is complete, ensuring you never forget to turn it off. Additionally, the device offers a safe automatic power-off feature, which enhances safety during operation. Convenient charging capabilities further simplify the user experience, which makes it easy to keep the steriliser ready for action.<br/><br/><br/><b>Eco-Friendly Design</b><br/><br/>Designed with sustainability in mind, this SVARAS steriliser promotes an eco-friendly lifestyle. It operates without mercury or harsh chemicals, which makes it safe for both users and the environment. This design choice allows you to maintain a clean living space while reducing your ecological footprint. Moreover, the sleek, modern appearance of the steriliser ensures that it complements any decor.</p>
Imagine looking at your phone screen and witnessing annoying air bubbles that disturb your view. Bubbles under a screen protector are a common nuisance, whether you are using a tempered glass or plastic film protector. This guide explores how to remove bubble on screen protector with practical, easy-to-follow methods. By reading on, you will discover effective screen protector bubble removal techniques, useful screen protector installation tips and troubleshooting strategies to ensure your phone remains pristine.
Often, bubbles form due to dust or debris getting trapped during installation. Uneven application pressure and minor misalignment can also lead to air pockets. Temperature fluctuations may affect the adhesive properties when applying the protector. These small gaps create the bubbles and diminish the experience of a clear phone screen cover.
Sometimes, residual air pockets remain hidden under the surface even after a careful application. Adhesive issues, particularly with certain screen protector materials, may continue to cause bubbles despite your best efforts to fix air bubbles on screen protector.
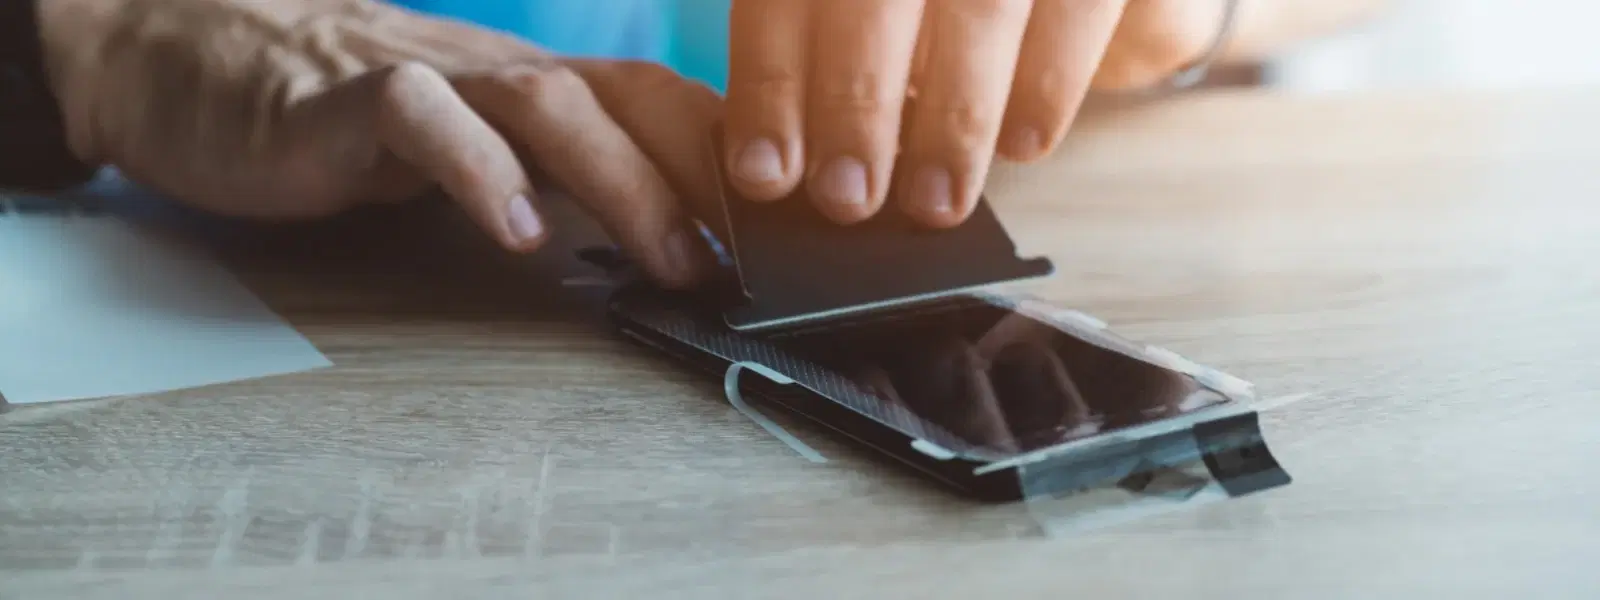
Begin by placing a plastic card or any smooth-edged tool at the centre of the screen protector. Gently push bubbles outward toward the edges using smooth, even strokes. This method helps to smooth out screen protector bubbles without causing damage to the screen cover.
If you suspect dust is the culprit behind the bubbles, try lifting one corner of the screen protector carefully. Use adhesive tape to remove the particles causing the issue. After cleaning, reapply the protector and press out any remaining air pockets to eliminate air pockets on screen protector.
On occasions when bubbles are particularly stubborn, use a hair dryer on a low-heat setting. Warming the screen protector slightly softens the adhesive, allowing you to gently press and get rid of bubbles on phone screen protector.

<p>Danger can overpower you at any time and your voice will not be enough in such situations to get the required aid. The amazing new <strong>Juvo PSB01 Personal Alarm</strong> is crafted for all ages and is a necessary precaution from all kinds of danger. It rings a very loud alarm at 120 dB as well as flashes the torch to warn people nearby about a danger. Whether you have a medical emergency or you are attacked by predators your voice may not be heard but this alarm will be enough to deter attackers or draw attention of people close by to give you the immediate assistance required.</p> <p><strong>Extremely Easy To Use</strong></p> <p>The <strong>Juvo PSB01 Personal Alarm</strong> is small and portable, can be attacked to even a keychain if you want. To start the siren all you need to do is separate or pull the metal key chain from the main black unit. The siren may go on for 1 1/2 hours in case nobody heard it in the first minutes. This is very important for girls returning home alone at night as it acts as a security anti-attack panic alarm that is sure to scare off a molester. Its easy portability accentuates its use.</p> <p><strong>Lights Your Way</strong></p> <p>The little and portable <strong>Juvo PSB01 Personal Alarm</strong> also features a small LED torch that helps you find your way in the dark. Don’t be scared of dark alleys when you have this with you because it is equipped to save you from all dangers.</p>
If bubbles persist despite the above efforts, consider removing the protector entirely. Clean your screen thoroughly and reapply the protector with renewed care. This process serves as an effective troubleshooting screen protector bubbles technique.
If you notice that the adhesive is worn out or if the protector is visibly damaged, replacement may be the best option instead of trying to fix bubbles under screen protector repeatedly.
To prevent future issues:
Apply the protector in a dust-free environment.
Ensure that the screen is thoroughly cleaned prior to installation.
Use an applicator tool for careful alignment.
Following these steps not only fixes existing bubbles but also helps prevent them in the future.
Did You Know? Installing a screen protector during the early morning or evening, when dust particles are minimal, drastically reduces the chances of bubble formation. This simple timing tactic can help you fix air bubbles on screen protector before they even appear.
Using the right tools is essential. A credit card or dedicated applicator tool works well to smooth out the protector after application. Always avoid using sharp objects that can scratch or damage the protector.
Maintaining a bubble-free installation involves regular cleaning of your screen protector surface to prevent dust buildup. Also, protect your device from extreme temperatures which can affect adhesion and may cause bubbles to form.

Retrieving data. Wait a few seconds and try to cut or copy again.
Just as a clear and well-applied screen protector enhances the usability of your smartphone, a seamless shopping experience adds value to your everyday life. At Tata Neu, not only do we offer expert guidance through detailed blog posts and live support, but you also earn NeuCoins with every purchase. Enjoy extra benefits like express delivery on orders placed before 6pm in selected locations, ensuring that you receive your products rapidly and securely.
Use a credit card or an applicator tool to gently push bubbles from the centre toward the edges.
Small bubbles might settle as the adhesive cures, but larger bubbles usually require manual intervention.
Yes, if the adhesive remains intact and the protector is free from debris or damage.
Carefully lift the edge, clean the underlying area with adhesive tape, and reapply the screen protector while smoothing out the bubbles.
Yes, extreme temperature fluctuations can cause the adhesive to expand or contract, resulting in bubbles.
Removing screen protector bubbles need not be a frustrating ordeal. By understanding the causes and applying the right techniques—from using a plastic card for gentle pressure to harnessing the power of low heat and maintaining a clean environment—you can achieve a flawlessly smooth screen protector every time. Consistent maintenance, combined with preventive measures, is key to smooth out screen protector bubbles. At Tata Neu, we believe in providing solutions that enhance your digital life, much like our seamless shopping experience supported by NeuCoin rewards and reliable after-sales support. Embrace these techniques to keep your device looking its best while enjoying the benefits of expert-guided, customer-first service.
