Consumer Electronics
•03 min read

<p>Danger can overpower you at any time and your voice will not be enough in such situations to get the required aid. The amazing new <strong>Juvo PSB01 Personal Alarm</strong> is crafted for all ages and is a necessary precaution from all kinds of danger. It rings a very loud alarm at 120 dB as well as flashes the torch to warn people nearby about a danger. Whether you have a medical emergency or you are attacked by predators your voice may not be heard but this alarm will be enough to deter attackers or draw attention of people close by to give you the immediate assistance required.</p> <p><strong>Extremely Easy To Use</strong></p> <p>The <strong>Juvo PSB01 Personal Alarm</strong> is small and portable, can be attacked to even a keychain if you want. To start the siren all you need to do is separate or pull the metal key chain from the main black unit. The siren may go on for 1 1/2 hours in case nobody heard it in the first minutes. This is very important for girls returning home alone at night as it acts as a security anti-attack panic alarm that is sure to scare off a molester. Its easy portability accentuates its use.</p> <p><strong>Lights Your Way</strong></p> <p>The little and portable <strong>Juvo PSB01 Personal Alarm</strong> also features a small LED torch that helps you find your way in the dark. Don’t be scared of dark alleys when you have this with you because it is equipped to save you from all dangers.</p>
Whether you're upgrading your system, troubleshooting issues, or simply prefer a clean install, installing macOS from a USB drive is a powerful and versatile option. This guide provides a thorough explanation of the process, answering frequently asked questions, and offering step-by-step instructions to help you easily prepare and use a bootable USB drive for your macOS installation. By the end of this post, you will understand how to install macOS from USB, how to create and prepare a macOS bootable USB drive, and how to troubleshoot common challenges along the way.
Using a USB drive for macOS installation is beneficial in many scenarios. It is ideal for performing a clean install where you need to start afresh or for upgrading older systems without complications. A USB-based installation provides flexibility, portability, and reliability. Whether your aim is system recovery or a complete installation overhaul, this method ensures you have control over the process.
Before you begin, ensure you have the following essentials:
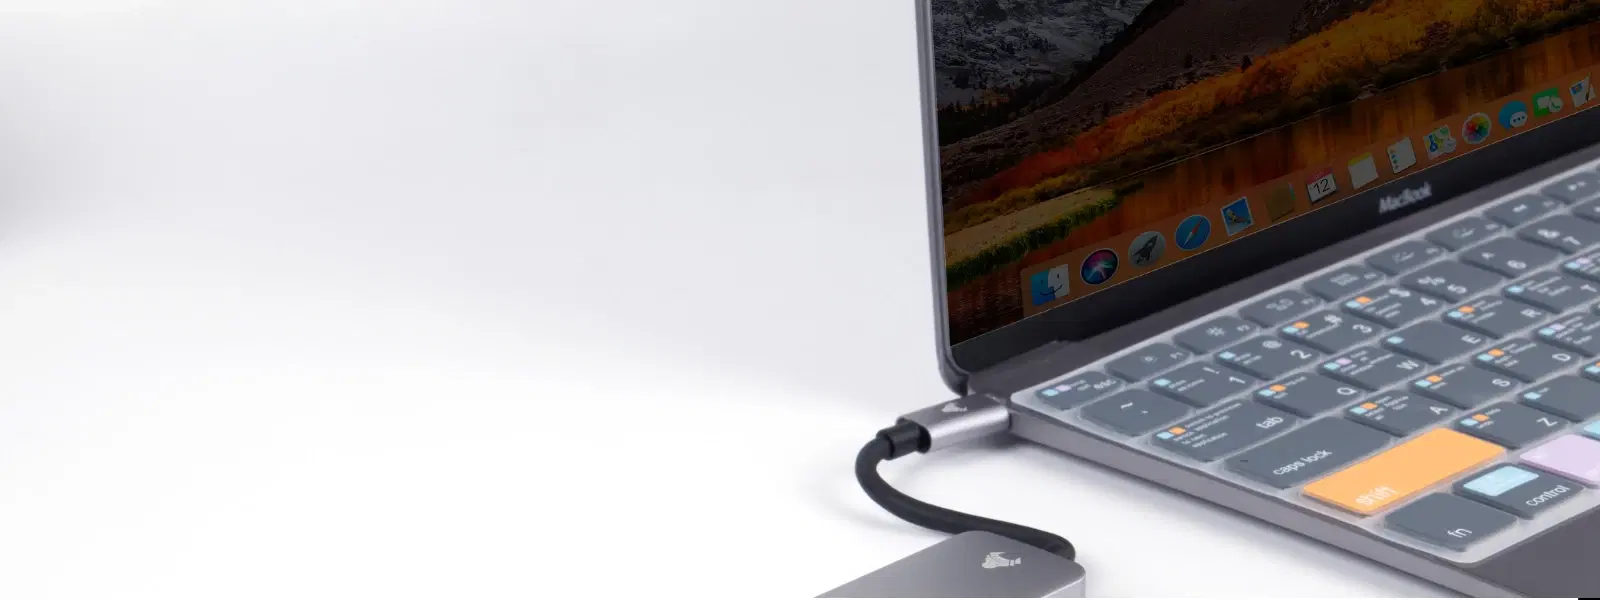
A compatible USB drive (a minimum of 16GB is recommended).
Access to a Mac to create the bootable installer.
The macOS installer file, which can be downloaded from the App Store or Apple Support.
Start by downloading the macOS installer file from the App Store or Apple Support. Be sure to check compatibility with your Mac hardware and choose the version that best suits your needs. This step is critical for a successful installation.

<p style="margin-left:0cm; margin-right:0cm">Keep away from breathing in harmful germs, dust and pollution by using the <strong>Arctic Fox N95 Gold Series</strong> <strong>Face Respirator Mask.</strong> The mask is designed specially ensuring that it fits comfortably on your face and covers all the essential parts of your face. The soft ear loops ensure the comfort-ability for longer use. It has a 3 mm foam material for comfort fit and air seal.</p> <p style="margin-left:0cm; margin-right:0cm">The <strong>Arctic Fox N95 Gold Series</strong> <strong>Face Respirator Mask</strong> is super breathable because of the comfortable fabric and is also splash resistant.</p> <p style="margin-left:0cm; margin-right:0cm">Whether you are travelling or for that matter, moving out of your house, wearing the <strong>Arctic Fox N95 Gold Series</strong> <strong>Face Respirator Mask </strong>will ensure security to your health by helping you keep the dust and germs out from inhaling it.</p>
Once you have the installer, format your USB drive using Disk Utility. This cleanses the drive, ensuring it is ready for the installation process. You can create a bootable macOS installer using Terminal commands. For users who prefer a graphical interface, there are GUI-based solutions available such as Etcher. These steps form the core of many macOS installation guides and are an essential part of the process to install macOS from USB drive.
To boot your Mac from the USB installer, restart your device and hold down the Option key during startup. This action brings up the boot menu, where you can select the USB drive as your startup disk. This method, often referred to as a USB boot macOS setup, is vital for successfully beginning the installation process.
There are two main approaches when using the macOS USB installer tutorial. A clean install erases the current data and installs macOS from scratch, ensuring no old files interfere with the new system. Alternatively, you can opt for an upgrade, keeping your settings and files intact while installing the new version of macOS. Choose the method that best meets your current needs, remembering that a macOS clean install USB might be recommended for an entirely fresh start.
Occasionally, you might encounter errors such as the USB drive not being recognised or the installer file appearing corrupted. In such cases, reformatting your USB drive or re-downloading the macOS installer is advisable. Following the correct macOS installation USB method steps carefully can help prevent these issues.
If your Mac does not boot from the USB, double-check that the USB drive is correctly selected as the startup disk and that your system’s security settings allow booting from external devices. Problems may arise due to the T2 security chip, which can be bypassed by adjusting your settings. These macOS USB boot troubleshooting tips are crucial for resolving issues quickly and efficiently.
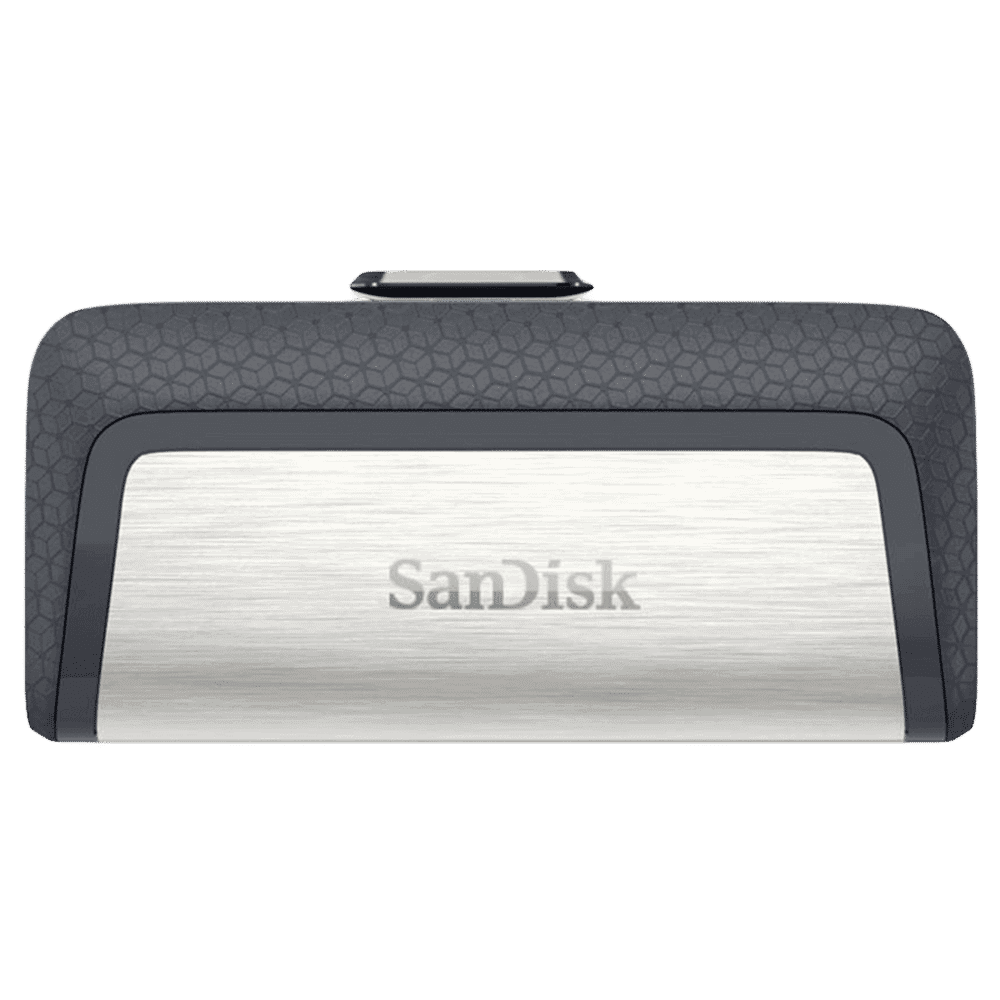
Buy SanDisk Ultra Dual Drive 32GB USB Type A (3.1), USB Type C (3.1) OTG Pen Drive (High-speed Performance, Black) online at best prices from Croma. Check product details, reviews & more. Shop now!
Insight Corner: "Did You Know?"
Creating a macOS bootable USB drive on Windows is possible using tools like TransMac or Etcher. This option is particularly helpful if you do not have immediate access to a Mac, further adding to the flexibility of the installation process.
Use Disk Utility to format your USB drive and execute Terminal commands to transfer the macOS installer file onto the drive.
Yes, third-party tools such as TransMac or Etcher allow you to create a bootable macOS USB drive on a Windows computer.
Ensure that the USB drive is correctly selected as the startup disk, review your system's security settings, and confirm that the USB drive is properly formatted.
Absolutely. Boot from the USB installer, choose to erase your current disk using Disk Utility, and then proceed with installing macOS from scratch.
You can use this method to install any macOS version that is compatible with your Mac hardware, provided you have the correct installer file.
Installing macOS from a USB drive is a straightforward process that empowers you with flexibility and control over your system setup. By following this detailed guide, you can easily prepare a bootable USB, install macOS successfully, and troubleshoot common issues. This method suits both a clean install and an upgrade, ensuring that you can tailor your approach to your specific needs. Just as Tata Neu simplifies your shopping experience by offering NeuCoins rewards and special benefits, this guide is designed to help you navigate your technical challenges with confidence and clarity. Enjoy seamless setup and reliable performance on your journey towards a more refined computing experience.
