Consumer Electronics
•03 min read

<p>Danger can overpower you at any time and your voice will not be enough in such situations to get the required aid. The amazing new <strong>Juvo PSB01 Personal Alarm</strong> is crafted for all ages and is a necessary precaution from all kinds of danger. It rings a very loud alarm at 120 dB as well as flashes the torch to warn people nearby about a danger. Whether you have a medical emergency or you are attacked by predators your voice may not be heard but this alarm will be enough to deter attackers or draw attention of people close by to give you the immediate assistance required.</p> <p><strong>Extremely Easy To Use</strong></p> <p>The <strong>Juvo PSB01 Personal Alarm</strong> is small and portable, can be attacked to even a keychain if you want. To start the siren all you need to do is separate or pull the metal key chain from the main black unit. The siren may go on for 1 1/2 hours in case nobody heard it in the first minutes. This is very important for girls returning home alone at night as it acts as a security anti-attack panic alarm that is sure to scare off a molester. Its easy portability accentuates its use.</p> <p><strong>Lights Your Way</strong></p> <p>The little and portable <strong>Juvo PSB01 Personal Alarm</strong> also features a small LED torch that helps you find your way in the dark. Don’t be scared of dark alleys when you have this with you because it is equipped to save you from all dangers.</p>
Did you know that renaming your USB drive can help you organise your files better and make your external storage more personal? This guide answers your frequently asked questions on how to rename a USB drive efficiently and safely without formatting it. Whether using Windows, macOS, Android or a Chromebook, you will find clear instructions to help you customise your device's name and keep your digital workspace neat and user-friendly.
A USB drive name is the unique identifier that your computer or mobile device displays when you plug in your external storage device. It is distinct from file labels within the drive and plays a key role in how you recognise your devices at a glance.
Renaming a USB drive can help you organise multiple devices with ease. By personalising your external storage, you simplify system navigation, especially in shared environments or when accessing many devices. It can also make locating files quicker and add a personal touch to your tech lifestyle.
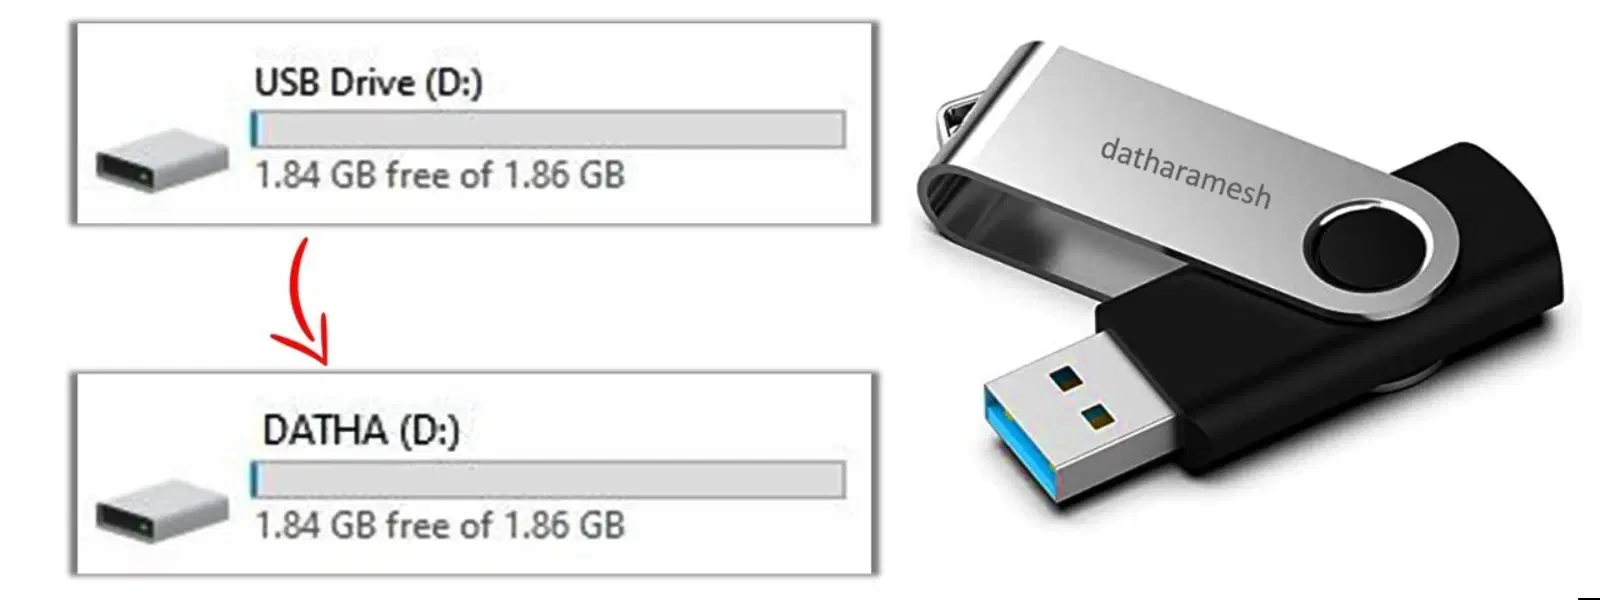
Follow these simple steps to rename your USB drive on Windows: 1) Plug in the USB drive and open File Explorer. 2) Right-click on the drive's name and select "Rename." 3) Type the new name—in line with your personal or organisational style—and press Enter. This method lets you modify the device’s display name instantly without needing to format the drive.
It is essential to know that you can change your external storage device’s name directly, and Windows does not require you to reformat your drive. This process preserves your files while updating the display name.
If you encounter issues such as the rename option being disabled or error messages, double-check your permissions and ensure no files are in use. This troubleshooting step keeps your device secure while allowing you to modify its name with ease.

<b>Why Buy Environics Device Disinfector</b><ul><li><b></b> for optimised disinfection</li><li><b></b> makes sure all the germs are killed</li></ul><p>To prevent harmful bacteria and fungi from getting in contact with you, buy <b>Environics Device Disinfector</b>. The usability of your device disinfector may be affected if its installation is complex. As this device disinfector has the it prevents the extra-spill and wastage of sanitizer. Your residence and office will stay clean and hygienic with products from this device disinfector that have 99.99% high resistance against germs and viruses. </p><p>The <b>Environics Device Disinfector's</b> price is cost-effective so you don't have to adjust your budget. The longer it takes for the device disinfector to disinfect, the longer you will have to wait. As a result of its efficient and effective operation, this device disinfector requires only to inject. Your device disinfector needs to have the latest technology to make sure it kills all the germs. As this device disinfector has the to prevent viruses, you can rest assured. Purchase the <b>Environics Device Disinfector</b> online at this instant!</p>
For macOS users, simply plug in your USB drive, open Finder, and locate your device. Right-click (or Control-click) on the drive’s name and select "Rename." Enter your desired name and confirm your changes. This process makes it straightforward to manage your external storage without altering its content.
Android users can also personalise their USB drive names effortlessly. Connect the USB drive via an OTG cable or available port, then open the file manager app. Find the drive, tap on the options available and select "Rename" to update the name of your device.
On Chromebooks, renaming an external storage device is similarly user-friendly. Using the Files app, locate your USB drive, select the rename option, and input your new preferred title. These cohesive steps ensure that no matter your operating system, your USB drive name reflects your unique style.
Pro Tip: Customize Your USB Drive for Maximum Efficiency
Adding unique identifiers such as your initials or project names to your USB drive can save you time when you work with multiple devices. A personalised name not only avoids confusion but also helps maintain a smooth workflow.
If you prefer a more advanced approach, consider utilising third-party software like a USB label editor or partition manager. These tools are designed to streamline the process and offer additional features such as batch renaming. This step is particularly useful if you maintain several drives with varied naming conventions.
Sometimes, formatting might be necessary—for instance, if the drive is corrupted. Formatting your device can help resolve technical issues and offers the opportunity to assign a fresh, new name. Just ensure you backup your data before proceeding, as formatting will erase all existing content.

<p><strong>Why buy Environics Enviroglobe Anti Radiation Ball for House & Car</strong></p> <p> </p> <ul> <li><strong>Provides E-Smog and Radiation Protection</strong> for healthier homes and families</li> <li><strong>It Covers A Radius</strong> of 250 sq.ft protect you and your loved ones from harmful radiation</li> <li><strong>Clinically Tested EMF Harmonizer</strong> that provides us 360-degree protection from radiation sources that are beyond our control</li> </ul> <p> </p> <p>Buy the <strong>Environics Enviroglobe Anti Radiation Ball for House & Car</strong> which is based on Envirochip’s radiation protection technology that helps you protect you and your loved ones from harmful radiation within an area of 250 sq. feet. You can extend the range of protection by placing multiple Enviroglobes at equal distances from one another. It is a clinically tested EMF harmonizer and provides us 360-degree protection from radiation sources that are beyond our control. Electromagnetic Radiation (EMR) refers to the constant waves of the electromagnetic field (EMF) produced by wireless communication devices such as mobile phones, laptops, Wi-Fi routers, and other sources such as mobile towers and high-tension wirelines, etc. However, The human body is accustomed to random waves and hence the constant exposure to electromagnetic radiation causes serious biological disorders such as higher stress and fatigue, irritation, headache, weakened immunity, cancer, fertility issues to name a few. The technology used in Enviroglobe changes the nature of electromagnetic radiation from constant to random waveform making it human body-friendly.</p> <p> </p> <p>When you get <strong>Environics Enviroglobe Anti Radiation Ball for House & Car</strong> online, you also get awesome companion for your home. It comes with Internationally tested and certified technology. No need of batteries or adaptors, you can simply charge by placing it under the sunlight, for only a couple of minutes every week. Enviroglobe is simple to use. Simply place it at your desk, table, living room, bedroom, car, office space, absolutely wherever you want, and get a radiation protected zone of up to 250 sq. feet. It provides e-smog and radiation protection for healthier homes and families. Purchase <strong>Environics Enviroglobe Anti Radiation Ball for House & Car</strong> online, now!</p>
Consider creative approaches when naming your USB drive. You can incorporate emojis or unique identifiers to add a personal flair. This helps differentiate the drive in environments where you work with multiple external storage devices and ensures you locate the right one quickly.
You can rename the USB drive directly via your operating system’s file manager, such as File Explorer on Windows or Finder on macOS. This method changes the device’s display name without altering the stored files or folders.
Simply right-click on your USB drive, select "Rename," and enter the new name ensuring you have the necessary permissions to make changes.
Renaming a USB drive doesn’t require a format. You can update its display name directly through your system’s file manager, leaving the stored data intact.
The procedure varies slightly across platforms. Whether you are using Windows, macOS, Android, or Chromebook, refer to the specific instructions provided above for detailed guidance.
Yes, most modern operating systems accept special characters such as underscores and even emojis. However, it is best to avoid symbols that might not be compatible across all devices to ensure smooth operation.
Renaming your USB drive is a quick and practical way to tailor your external storage for a more organised and personalised digital experience. The process is straightforward across multiple platforms, ensuring that whether you need to change USB drive name, rename flash drive, or simply edit USB label, you can do so with confidence. By following these clear instructions and leveraging tips for customisation, you not only enhance your tech setup but also earn NeuCoins rewards on Tata Neu—a platform trusted for seamless shopping. Enjoy personalising your device while maximising efficiency in your workflow.
