Consumer Electronics
•04 min read

<b>Why Buy Environics Device Disinfector</b><ul><li><b></b> for optimised disinfection</li><li><b></b> makes sure all the germs are killed</li></ul><p>To prevent harmful bacteria and fungi from getting in contact with you, buy <b>Environics Device Disinfector</b>. The usability of your device disinfector may be affected if its installation is complex. As this device disinfector has the it prevents the extra-spill and wastage of sanitizer. Your residence and office will stay clean and hygienic with products from this device disinfector that have 99.99% high resistance against germs and viruses. </p><p>The <b>Environics Device Disinfector's</b> price is cost-effective so you don't have to adjust your budget. The longer it takes for the device disinfector to disinfect, the longer you will have to wait. As a result of its efficient and effective operation, this device disinfector requires only to inject. Your device disinfector needs to have the latest technology to make sure it kills all the germs. As this device disinfector has the to prevent viruses, you can rest assured. Purchase the <b>Environics Device Disinfector</b> online at this instant!</p>
Ever found yourself fumbling with cables and settings while trying to connect your Mac to a projector moments before a big presentation? You're not alone! This guide breaks down the process to help you set up your display quickly and with confidence. Whether you're planning a professional presentation, a family movie night, or a collaborative work session, learning how to connect Mac to projector is essential for an uninterrupted experience.
Your Mac may come with various ports such as USB-C, HDMI, or Thunderbolt. Knowing which ports your device features is the first step for a smooth Mac to projector setup. For instance, some MacBook Air models use USB-C ports, while many MacBook Pro devices offer multiple options. Identifying these will help you choose the right adapter for your needs.
Most projectors support inputs like HDMI, VGA, or even USB. When looking into a projector connection for Mac, it’s important to ensure that the projector’s input options match the output capabilities of your Mac. This compatibility is key whether you are planning a Mac HDMI to projector connection or exploring another alternative.
Once you know the ports on your Mac and the input types of your projector, selecting the right adapter or cable is crucial. Options include USB-C to HDMI cables or USB-C to VGA adapters. Such correct choices are essential for a hassle-free experience when you wish to connect MacBook to projector.
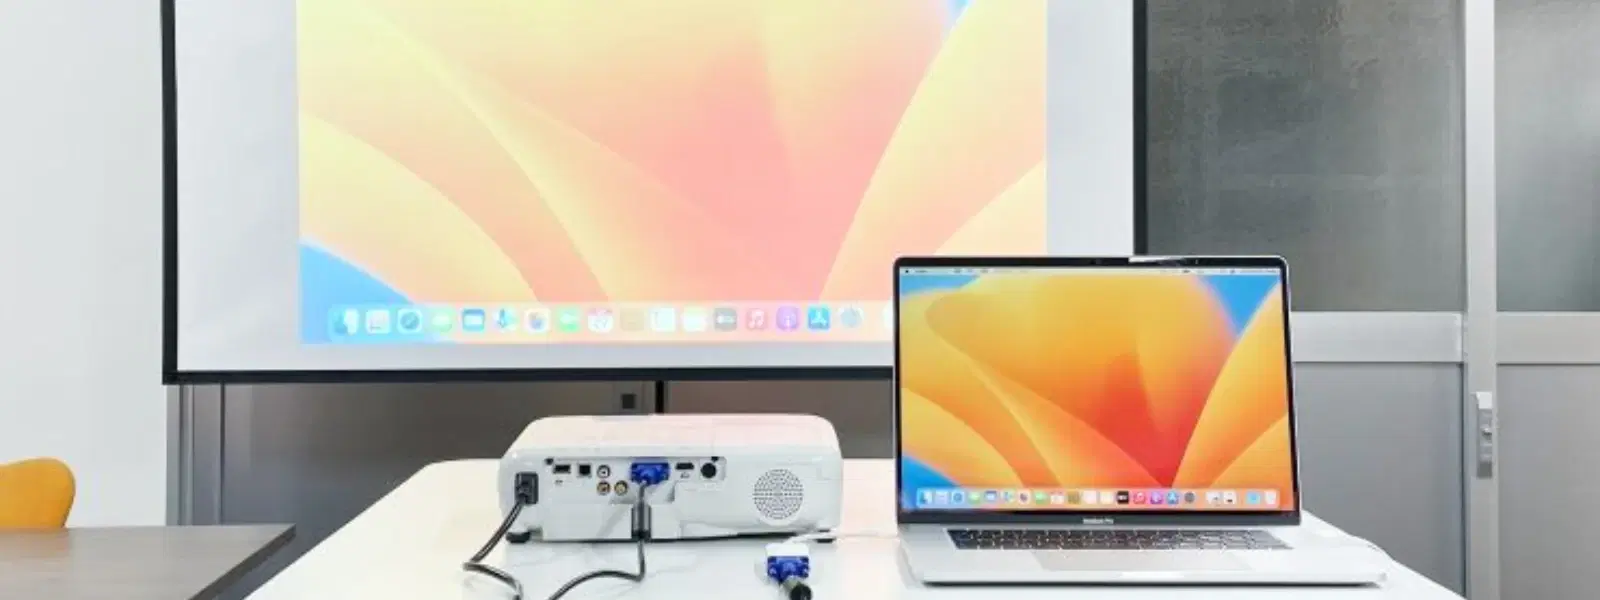
The process is simple: plug an HDMI adapter into your Mac, then connect the HDMI cable from the adapter to your projector. After making the physical connection, head over to Mac display settings for projector by navigating to System Preferences > Displays. Adjust the resolution and choose either screen mirroring or extended display mode according to your presentation needs.
If your Mac relies on USB-C ports, a USB-C to HDMI or VGA adapter is your best friend. Plug the adapter into your MacBook and connect the appropriate cable to the projector. This method is increasingly popular among new Mac models, ensuring that you can connect MacBook Air to projector easily.
Occasionally, even the simplest connections encounter issues like "no signal detected" or resolution mismatches. If your display isn’t showing properly, re-check the connections and ensure you have properly set the projector's input mode. For any persistent difficulties, a quick review of troubleshoot Mac projector connection steps in your System Preferences can often provide the answer.

<p>Danger can overpower you at any time and your voice will not be enough in such situations to get the required aid. The amazing new <strong>Juvo PSB01 Personal Alarm</strong> is crafted for all ages and is a necessary precaution from all kinds of danger. It rings a very loud alarm at 120 dB as well as flashes the torch to warn people nearby about a danger. Whether you have a medical emergency or you are attacked by predators your voice may not be heard but this alarm will be enough to deter attackers or draw attention of people close by to give you the immediate assistance required.</p> <p><strong>Extremely Easy To Use</strong></p> <p>The <strong>Juvo PSB01 Personal Alarm</strong> is small and portable, can be attacked to even a keychain if you want. To start the siren all you need to do is separate or pull the metal key chain from the main black unit. The siren may go on for 1 1/2 hours in case nobody heard it in the first minutes. This is very important for girls returning home alone at night as it acts as a security anti-attack panic alarm that is sure to scare off a molester. Its easy portability accentuates its use.</p> <p><strong>Lights Your Way</strong></p> <p>The little and portable <strong>Juvo PSB01 Personal Alarm</strong> also features a small LED torch that helps you find your way in the dark. Don’t be scared of dark alleys when you have this with you because it is equipped to save you from all dangers.</p>
If you prefer a cable-free experience, AirPlay provides an excellent solution for screen mirroring Mac to projector. With Apple TV or an AirPlay-compatible projector, you can easily stream your Mac’s display without the physical tether. This wireless method is perfect when you need a wireless projector connection Mac for a streamlined setup.
For those without an AirPlay device, third-party tools like Miracast or Chromecast can enable a wireless connection from your Mac. These solutions ensure that even if your projector lacks direct AirPlay support, you can still enjoy a wireless setup experience. It’s always wise to double-check your projector’s specifications before finalising your approach.
Wireless connections offer a clutter-free environment and greater mobility during presentations. No more tangled cords or restricted layouts—just a clean, efficient setup that lets you amend screen mirroring Mac to projector arrangements with ease.
After establishing the physical connection, head to System Preferences on your Mac. Here, you can adjust the resolution and tweak display settings to ensure that the projected image is crisp and clear. Aligning your Mac display settings for projector use enhances the quality of every presentation.
You can choose between duplicating your screen or extending your desktop. For presentations, screen mirroring replicates your Mac’s display onto the projector. Alternatively, an extended display offers more room to manage multiple applications simultaneously, ideal for more detailed work. Both options are straightforward to set up.
Ensure you have familiarised yourself with your presentation tools. For instance, using tools like digital slideshows or presenter modes in macOS can significantly enhance the delivery of your content. These practices not only streamline the experience, they also mirror the approach of seamless and smart transactions on platforms like Tata Neu, where preparation and reliability play key roles.
Pro Tip: Simplify Your Setup with Pre-Tested Connections
Did you know? Testing your Mac-to-projector connection before your presentation can save you from last-minute stress. Always carry spare adapters and cables to ensure smooth operation.

<p><b>HEUV Technology</b><br/><br/>Thanks to the HEUV technology, the SVARAS Home X2 Pro UV Steriliser effectively targets and eliminates a wide range of viruses and bacteria, including those responsible for illnesses such as the coronavirus. As a result, you can have peace of mind knowing that you can effectively protect yourself and your family from potential health threats.<br/><br/><br/><b>Enhanced Sterilisation</b><br/><br/>This rechargeable UV steriliser provides optimal sterilisation capabilities, which eliminates harmful germs. This high level of effectiveness makes it an ideal choice for homes, offices, and shops, ensuring that surfaces remain clean and safe. Thus, you can trust this steriliser to protect your health and the health of your loved ones by efficiently disinfecting various surfaces.<br/><br/><br/><b>User-Friendly Functionality</b><br/><br/>This home steriliser boasts convenient features that enhance its usability. It includes a voice alarm that signals when the sterilisation process is complete, ensuring you never forget to turn it off. Additionally, the device offers a safe automatic power-off feature, which enhances safety during operation. Convenient charging capabilities further simplify the user experience, which makes it easy to keep the steriliser ready for action.<br/><br/><br/><b>Eco-Friendly Design</b><br/><br/>Designed with sustainability in mind, this SVARAS steriliser promotes an eco-friendly lifestyle. It operates without mercury or harsh chemicals, which makes it safe for both users and the environment. This design choice allows you to maintain a clean living space while reducing your ecological footprint. Moreover, the sleek, modern appearance of the steriliser ensures that it complements any decor.</p>
If your projector shows a blank screen, begin by verifying that the correct input is selected on the projector. It may help to disconnect and reconnect the cables or adapter. Often, simply revisiting the Mac display settings for projector can reveal minor adjustments that resolve the issue.
When your MacBook Pro projector connection seems unresponsive, re-check the connections and ensure that your Mac’s software settings are up-to-date. Confirm that the cable or adapter is functioning properly. Often, a quick reboot of your Mac in addition to verifying the input selection on the projector clears the problem.
If the projected image appears distorted, adjust the resolution manually. Navigate to System Preferences > Displays and select a resolution that aligns with your projector’s capabilities. This step usually fixes any issues with the image quality of your projector connection for Mac.
Plug an HDMI cable into your projector and connect it to your Mac using an adapter if necessary. Then, configure the display settings under "System Preferences > Displays."
Use AirPlay for Apple TV or compatible projectors. Alternatively, try third-party solutions like Miracast or Chromecast.
Ensure the correct input is selected on the projector, check cable connections, and adjust display settings on your Mac.
Yes, you can connect a MacBook Air to a projector using an HDMI adapter, USB-C cable, or wireless options like AirPlay.
Go to "System Preferences > Displays" and manually adjust the resolution settings to match the projector's compatibility.
In summary, this guide has provided you with a clear pathway to connect your Mac to a projector through both wired and wireless methods. By understanding the ports, selecting the right cables or adapters, and optimising display settings, you can enhance your presentation experience and reduce last-minute worries. Every step, from checking compatibility to troubleshooting, contributes to a seamless and efficient setup, similar to the smooth and rewarding shopping experience on Tata Neu.
