%20(Presentation)%20(1600%20x%20600%20px)(488)-54cd96ce-d69e-4ac7-914f-ae436fcee76d.webp&w=3840&q=75)
Consumer Electronics
•04 min read
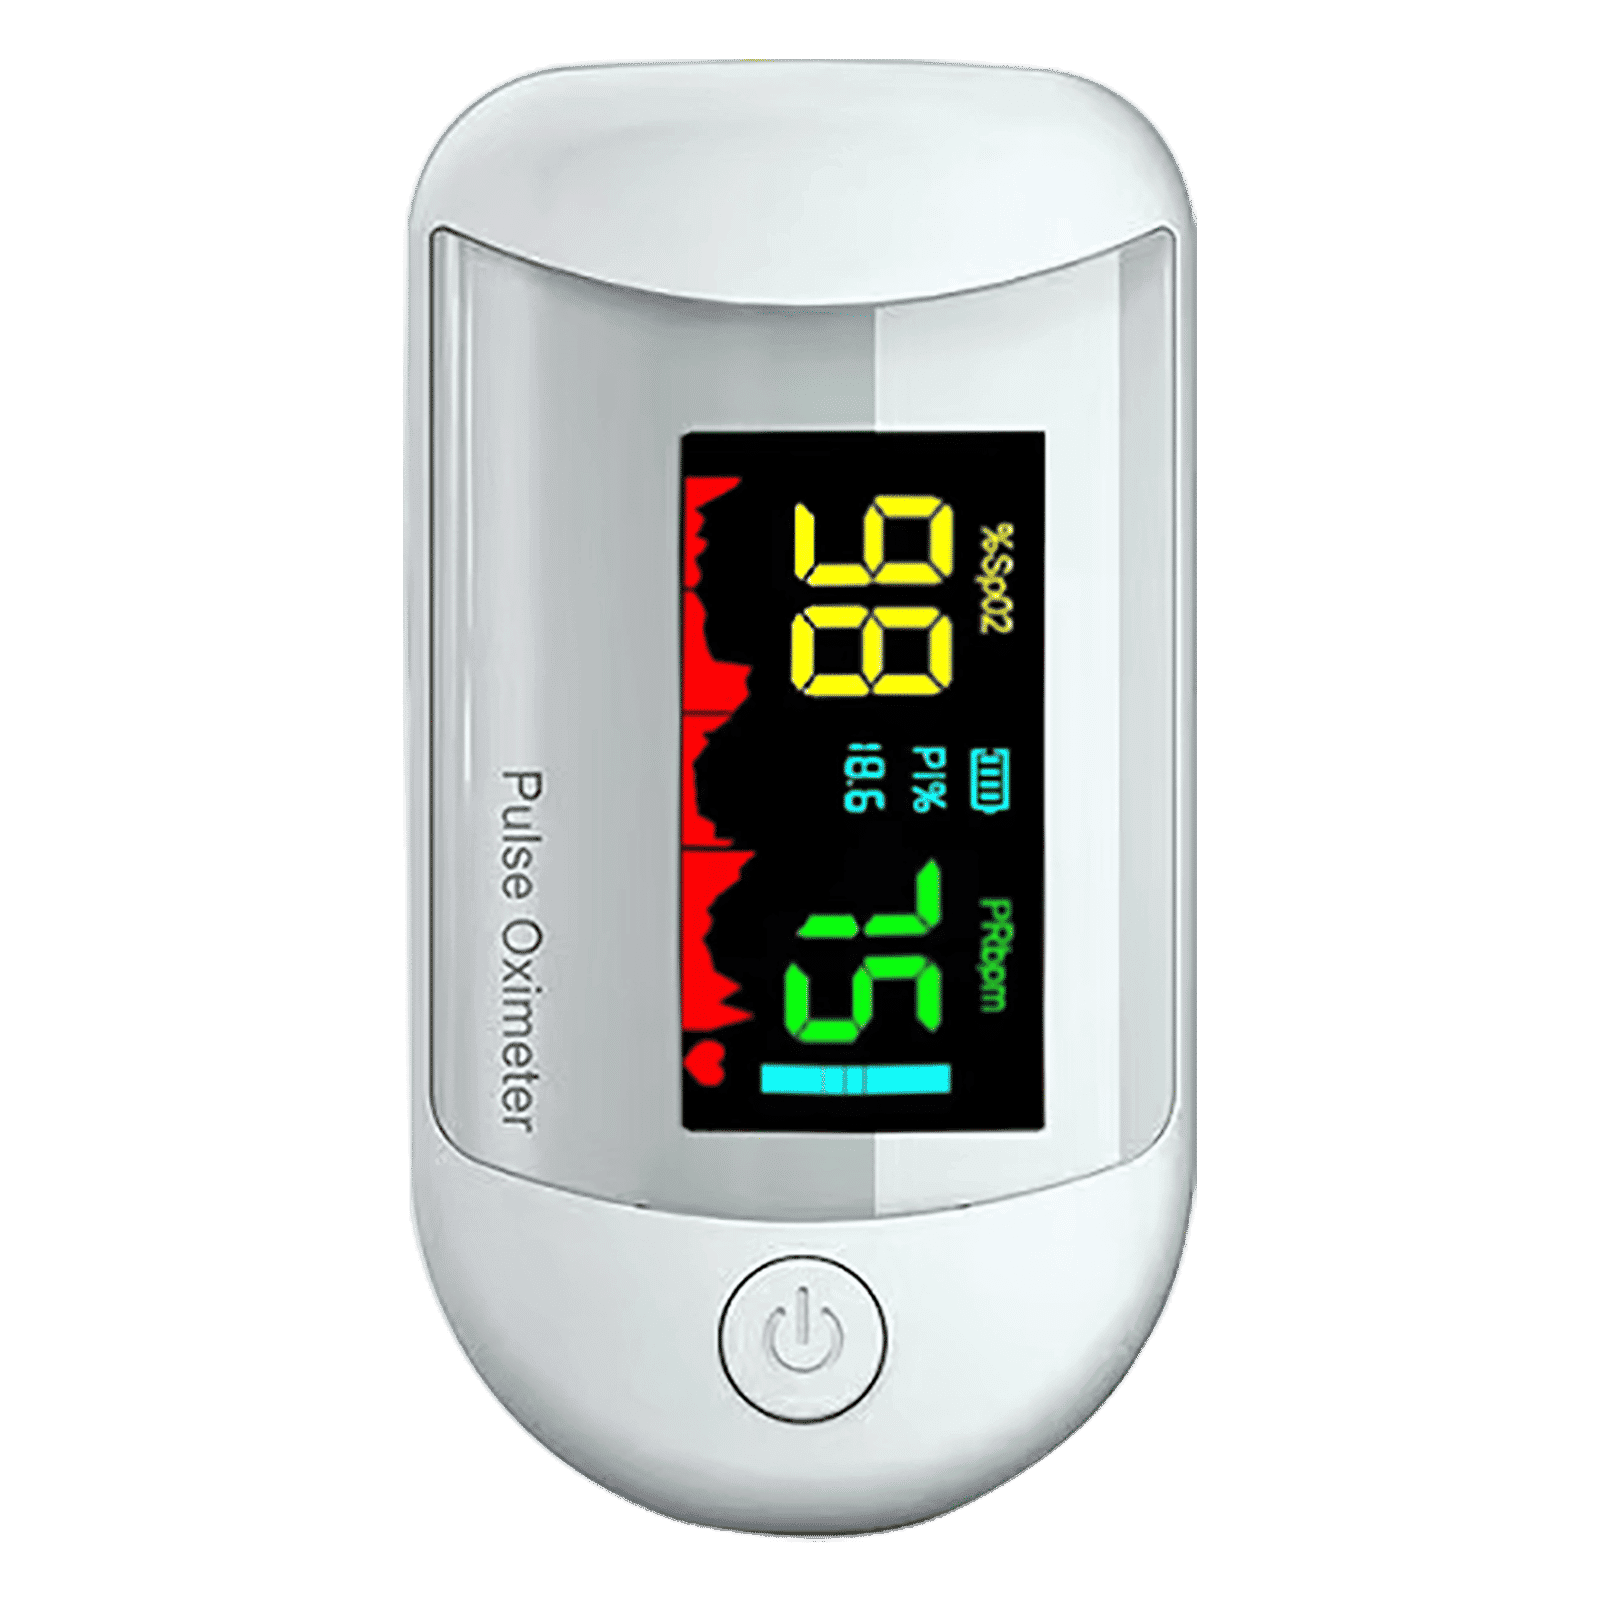
<p><strong>Why buy iGear Health Digital Pulse Monitor/Oximeter</strong></p> <p> </p> <ul> <li><strong>Fast, Reliable Measurement</strong> of Oxygen Saturation (SpO2) and Pulse (PR bpm) within 5-8 seconds</li> <li><strong>Perfusion Index</strong> of 0.3% measures even the weakest of the Pulse</li> <li><strong>Auto Power Off</strong> when not in use</li> <li><strong>4 Direction Display</strong> and Multi-coloured Display for ease of reading</li> <li><strong>Infrared Sensor</strong> for seamless operation</li> </ul> <p> </p> <p>Stay healthy and fit by keeping a regular check of your oxygen level by bringing home the <strong>iGear Health Digital Pulse Monitor/Oximeter</strong>. Although, the Blood pressure monitor may be the most recognizable medical tool in the market, but Pulse Oximeter is a close second for the most-used medical device. Being fast and reliable, the <strong>iGear Health Digital Pulse Monitor/Oximeter</strong> measures the amount of oxygenated blood (Spo2) in your body, giving medical professionals an idea of how much oxygen your body is carrying to vital organs and tissues. It measures Oxygen Saturation (SpO2) and Pulse (PR bpm) within 5-8 seconds. It comes with a measuring range of 0 – 100% (Oxygen Saturation) and 25 – 250 bpm (Pulse Rate). It has accuracy in readings of Oxygen Concentration in the Blood range 0-100% (+/- 2%) and Pulse rate range 25-250 bpm (+/- 2 bpm). It comes with a Perfusion Index of 0.3%, which can measure even the weakest of the Pulse.</p> <p> </p> <p>Having the <strong>iGear Health Digital Pulse Monitor/Oximeter</strong> at home allows the patients to monitor vital signs with an extra layer. These tools give you a better view of your health and allow you to coordinate with your healthcare provider. If you have a condition that affects your blood oxygen levels -think sleep apnea, chronic obstructive pulmonary disease (COPD), asthma, lung cancer, or heart failure, among many other conditions you may benefit from an at-home Pulse Oximeter. It comes with Infrared Sensor that seamlessly records all the readings. The One-click measurement of the device makes it convenient to operate. Viewing the readings will no longer be a struggle. Thanks to the 4 direction display and multi-colored display that makes viewing the reading simple and easy. Being battery operated, it offers long-lasting usage having an auto power-off feature. So, wait no more! Order the <strong>iGear Health Digital Pulse Monitor/Oximeter</strong> online, right away!</p>
Ever taken a screenshot on your Mac, only to wonder where it disappeared to? Screenshots are very useful for capturing key moments or details during your work or leisure, yet finding them can sometimes be a puzzle. This guide is a comprehensive checklist to help you learn where to find screenshots on Mac. You will discover the default screenshot location, methods to locate them using Finder, Spotlight and even Terminal commands. You will also learn how to customise your screenshot settings, organise your captures, and troubleshoot any issues effectively.
By default, macOS saves your screenshots on the Desktop. When you capture a screenshot, the file is typically saved in PNG format. You will notice the file naming convention follows a pattern, for example, "Screenshot 2023-10-10 at 10.30.00.png". It is important to note that these settings apply unless you change the default screenshot location.
If you are wondering where are screenshots stored on mac, there might be several reasons why your files are not in their expected location. They may have been accidentally deleted, saved to a different folder, or even hidden due to a brief system glitch. Keep calm and follow the methods below to troubleshoot and find your files easily.
Finder is a simple way to locate your screenshots. Open Finder and type Screenshot into the search bar. You can refine your search by filtering for PNG files or using the file date. This approach is one of the easiest methods to find saved screenshots on Mac without needing any technical expertise.
Spotlight offers a quicker alternative. Press Cmd + Space and type Screenshot or even .png to pull up related files. This quick search is especially helpful if you are looking for a specific capture. By utilising these simple steps, you can easily view screenshots on Mac.
For users who are a bit more comfortable with command lines, Terminal offers a powerful way to locate screenshots. For instance, you might run the command find ~/Desktop -name "Screenshot*" to list all screenshot files in your Desktop folder. This method provides the mac screenshot file path directly through the command line, and can be especially useful when you need an exact location.

<p><b>HEUV Technology</b><br/><br/>Thanks to the HEUV technology, the SVARAS Home X2 Pro UV Steriliser effectively targets and eliminates a wide range of viruses and bacteria, including those responsible for illnesses such as the coronavirus. As a result, you can have peace of mind knowing that you can effectively protect yourself and your family from potential health threats.<br/><br/><br/><b>Enhanced Sterilisation</b><br/><br/>This rechargeable UV steriliser provides optimal sterilisation capabilities, which eliminates harmful germs. This high level of effectiveness makes it an ideal choice for homes, offices, and shops, ensuring that surfaces remain clean and safe. Thus, you can trust this steriliser to protect your health and the health of your loved ones by efficiently disinfecting various surfaces.<br/><br/><br/><b>User-Friendly Functionality</b><br/><br/>This home steriliser boasts convenient features that enhance its usability. It includes a voice alarm that signals when the sterilisation process is complete, ensuring you never forget to turn it off. Additionally, the device offers a safe automatic power-off feature, which enhances safety during operation. Convenient charging capabilities further simplify the user experience, which makes it easy to keep the steriliser ready for action.<br/><br/><br/><b>Eco-Friendly Design</b><br/><br/>Designed with sustainability in mind, this SVARAS steriliser promotes an eco-friendly lifestyle. It operates without mercury or harsh chemicals, which makes it safe for both users and the environment. This design choice allows you to maintain a clean living space while reducing your ecological footprint. Moreover, the sleek, modern appearance of the steriliser ensures that it complements any decor.</p>
If you prefer to set a different folder for your screenshots, macOS Mojave and later versions offer a simple tool. Press Cmd + Shift + 5 to launch the Screenshot Tool. In the options menu, you can choose a new location. This tool makes it easy to customise your default screenshot location mac, ensuring that you always know where to access your screenshots.
For those using older macOS versions, Terminal commands can be used to change the screenshot folder. Use the command that updates the path to your new preferred folder. This method allows you to set a specific folder for your screenshot storage mac, ensuring consistency and ease of access.
Organising your screenshots is as important as capturing them. Create a dedicated folder – a mac screenshot folder – and use macOS tags to mark important files. This simple practice will help you locate screenshots on Mac much faster in the future. With a system as organised as you can have in your workflow, you can easily progress in your tasks and even take advantage of NeuCoins rewards and special benefits on Tata Neu for managing your digital life smartly.
macOS offers tools like Floating Thumbnail and Quick Look to preview screenshots immediately after capturing. You may also use Markup tools or the Preview app for quick editing tasks. These features let you fine-tune your files without interrupting your creative flow.
Pro Tip: Streamline Your Screenshot Workflow
Did you know you can place your screenshots folder directly in the Dock for faster access? Simply drag your folder to the Dock, and you’ll have instant access to all your captures.

<p>Danger can overpower you at any time and your voice will not be enough in such situations to get the required aid. The amazing new <strong>Juvo PSB01 Personal Alarm</strong> is crafted for all ages and is a necessary precaution from all kinds of danger. It rings a very loud alarm at 120 dB as well as flashes the torch to warn people nearby about a danger. Whether you have a medical emergency or you are attacked by predators your voice may not be heard but this alarm will be enough to deter attackers or draw attention of people close by to give you the immediate assistance required.</p> <p><strong>Extremely Easy To Use</strong></p> <p>The <strong>Juvo PSB01 Personal Alarm</strong> is small and portable, can be attacked to even a keychain if you want. To start the siren all you need to do is separate or pull the metal key chain from the main black unit. The siren may go on for 1 1/2 hours in case nobody heard it in the first minutes. This is very important for girls returning home alone at night as it acts as a security anti-attack panic alarm that is sure to scare off a molester. Its easy portability accentuates its use.</p> <p><strong>Lights Your Way</strong></p> <p>The little and portable <strong>Juvo PSB01 Personal Alarm</strong> also features a small LED torch that helps you find your way in the dark. Don’t be scared of dark alleys when you have this with you because it is equipped to save you from all dangers.</p>
If you suspect that screenshots have been deleted accidentally, check your Trash folder first. In addition, if you use Time Machine backups, you might be able to recover any lost files with ease.
Issues such as insufficient storage or permissions settings might prevent screenshots from saving correctly. If you run into such problems, try restarting your Screenshot Tool or double-check your system preferences. Taking these steps should resolve most issues related to screenshot storage mac.
Screenshots are saved to the Desktop by default unless the save location is changed.
Use the Floating Thumbnail feature to open Markup tools or edit the screenshot in Preview.
Screenshots may have been accidentally deleted, saved to a different folder, or hidden due to system glitches. Use Finder or Spotlight to locate them.
Use the Screenshot Tool (Cmd + Shift + 5) to select a new save location or use Terminal commands in older macOS versions.
Yes, screenshots copied to the clipboard can be pasted into your apps using the Cmd + V shortcut.
By following this checklist, you now have a clear roadmap of where to find screenshots on Mac. We have explored the default storage location, outlined multiple methods to locate your files, and shown you how to tailor your screenshot settings. Additionally, managing and organising your files is made easy with macOS tools, ensuring that your digital workspace remains efficient. For any tech enthusiast or professional managing a busy workflow, these tips not only help in organising your digital captures but also mirror the seamless and thoughtful approach provided by Tata Neu, where every transaction can earn you NeuCoins, paving the way for smarter shopping choices.
