Consumer Electronics
•05 min read

Buy Aquaguard Enrich Astor 5L RO + UV + Alkaline 2X Water Purifier with Mega Sediment Filter (Black) online at best prices from Croma. Check product details, reviews & more. Shop now!
The night sky offers a canvas that mesmerises and inspires, but capturing its stunning beauty requires a blend of technical skill and creative vision. When you set your sights on star photography, you are embarking on a journey that transforms ordinary nights into extraordinary memories. This guide unlocks the secrets behind star photography settings, revealing how meticulous adjustments can elevate your images from simple snapshots to works of art. Star photography enthusiasts can earn exclusive NeuCoins rewards and enjoy special benefits when shopping for the latest camera gear on Tata Neu.
Every element that contributes to a captivating star photo has its roots in precise camera settings. The balance between ISO, shutter speed, and aperture is crucial as it determines how much detail the lens captures, from faint luminescent stars to the breathtaking expanse of the Milky Way. For instance, in areas with light pollution or rapid changes in ambient lighting, the right settings can be the determining factor between a blurry, underexposed shot and one that radiates magic.
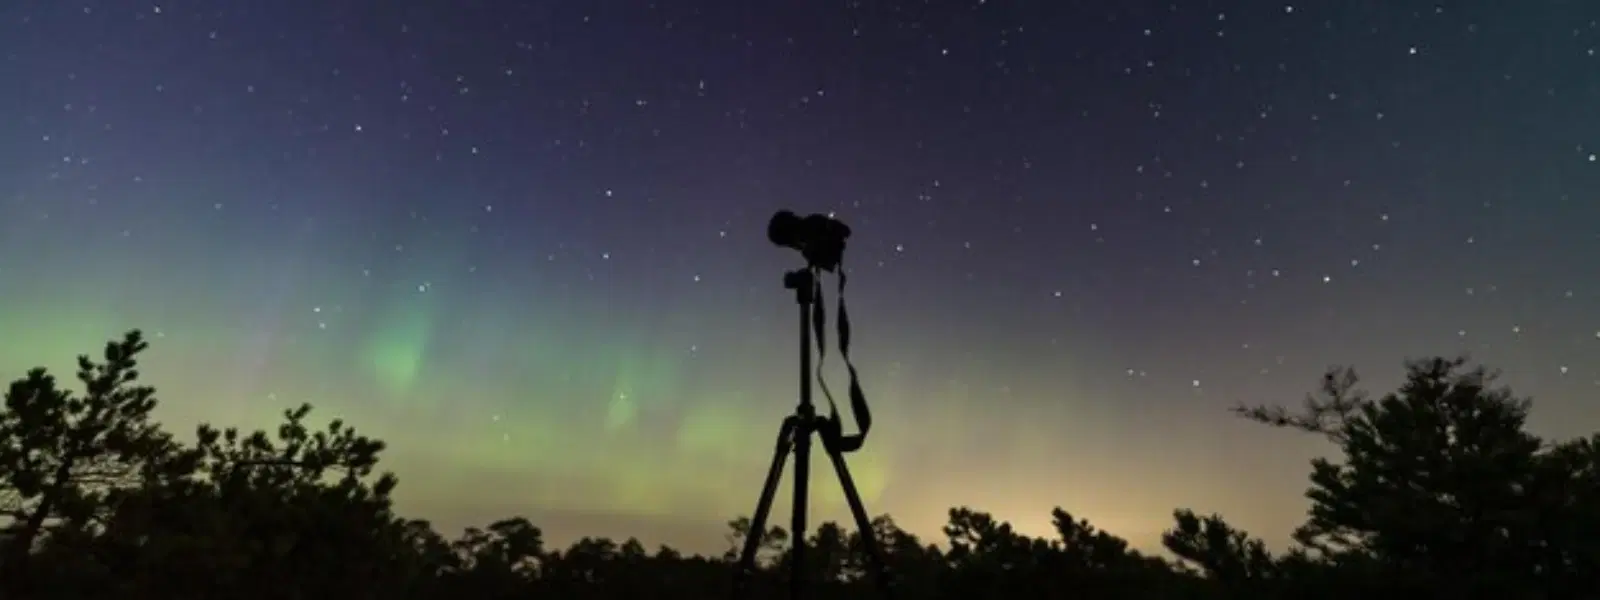
Equipping yourself with the right tools is the first step towards mastering star photography. A sturdy camera that supports manual settings, paired with a high-quality wide-angle lens and a reliable tripod, can significantly enhance your shooting experience. Additionally, devices such as intervalometers (a device that helps control time-lapse photography) and remote shutters offer improved control during long exposure sessions. Apps like Stellarium also help plan shoots by predicting the positions of stars and constellations, ensuring that you never miss a magical moment.
ISO plays a pivotal role in star photography by determining the camera’s sensitivity to light. A higher ISO allows for capturing the faint glow of distant stars, yet it can often introduce some noise into the image. Typically, an ISO range between 800 and 3200 suits most conditions. Experimenting with your camera’s noise reduction techniques can further help maintain clarity while ensuring those elusive details of the night are beautifully recorded.
Aperture is equally important. A wider aperture, for example at f/2.8 or f/4, allows more light to reach the sensor, making it easier to capture stunning, well-lit star images. The trick is to avoid the pitfalls of lens aberrations while capturing as much of the delicate starlight as possible. Fine-tuning your aperture based on the shooting conditions and the specific elements you wish to highlight can considerably improve your image quality.

Buy PHILIPS BT3302/15 Rechargeable Cordless Dry Trimmer for Beard and Body with 10 Length Settings for Men (60mins Runtime, Stainless Steel Blade, Black and Grey) online at best prices from Croma. Check product details, reviews & more. Shop now!
Shutter speed is the key to managing how long the sensor is exposed to light, thus influencing how the stars are portrayed. A very useful guideline that many photographers rely on is the '500 Rule'. This guideline is widely recommended by professional astrophotographers. By dividing 500 by the focal length of your lens (considering the crop factor), you determine the maximum exposure time to capture stars without trailing. For example, using a 20mm lens on a full-frame camera typically permits a shutter speed of up to around 25 seconds. Adjusting shutter speeds is essential when transitioning between capturing the stationary brilliance of the Milky Way or the dynamic motion of meteor showers.
Pro Tip: The 500 Rule Demystified
Did you know? The 500 Rule helps you calculate the maximum shutter speed to avoid star trails. Divide 500 by your lens's focal length (adjusted for crop factor) to find the perfect exposure time. For example, a 20mm lens on a full-frame camera allows a shutter speed of up to 25 seconds!
One of the challenges in star photography is achieving precise focus in low light. Manual focus is the go-to method, as it gives you complete control beyond what automatic settings offer. Engage the live view mode on your camera and carefully adjust until a bright star or planet is perfectly sharp. Relying on infinity focus is helpful, but always double-check using manual adjustments to account for slight variations. Even small tweaks can make a significant difference in capturing crisp, detailed star photos.
Manual mode is indispensable in astrophotography. It empowers you to fine-tune each setting—ISO, shutter speed, and aperture—so they harmonise perfectly with the unique conditions of the night. Navigating through manual mode might feel challenging initially, but with practice, you will gain full creative control. This mastery allows you to adjust your settings dynamically, ensuring optimal exposure regardless of the changing night sky.
Beyond technical settings, composition is the artistic element that transforms a photograph. Including foreground elements such as silhouettes of trees, mountains, or even human-made structures adds context and depth to your star scenes. Using leading lines, you can draw the viewer's eye towards the constellations or the luminous arc of the Milky Way. Balancing technical mastery with a creative vision is the secret to truly captivating star photography.
Star photography is not without its challenges. Common issues include condensation on lenses, unavoidable light pollution, and unintended star trails. One way to address these concerns is by using lens hoods and filters while scouting for locations under dark skies. Adjusting your camera settings gradually in response to the conditions can help maintain a balanced exposure. Persistent challenges rarely have one fix. Experimentation and a willingness to adapt are key ingredients in overcoming these obstacles.

<p><b>Enhanced Cleaning Technology</b><br/><br/>The MILAGROW 24W Robotic Vacuum Cleaner offers reliable wet and dry cleaning capabilities, which makes it an ideal choice for both home and office environments. Equipped with the enhanced NIDEC Brushless Motor, it delivers a powerful suction of 1500Pa, which ensures effective dirt and debris removal across various surfaces.<br/><br/><br/><b>Smart Navigation </b><br/><br/>Utilising cutting-edge Gyro Mapping technology, this robotic vacuum cleaner employs earth's gravity for optimal orientation and navigation. The rotor mechanism accurately measures rotation rates, which enables the device to stabilise and efficiently map out cleaning paths. It features four cleaning modes - smart, wall follow, spiral, and remote control – which allows for versatile cleaning strategies tailored to your space.<br/><br/><br/><b>Reliable Battery Life</b><br/><br/>Powered by a robust 2600mAh battery, this 24W vacuum cleaner boasts an optimum working time of up to 110 minutes. It can cover up to 1800 square feet on a single charge, which ensures comprehensive cleaning throughout your space without frequent interruptions. The 0.6-litre dustbin is designed to handle substantial dirt loads, while the 0.11-litre water tank facilitates effective wet cleaning.<br/><br/><br/><b>Efficient Filter System</b><br/><br/>Featuring a triple filter system which includes HEPA 12 filtration, this vacuum cleaner ensures the removal of most of the airborne particles as small as 0.3 microns. It effectively captures allergens, dust mites, mould spores, and even fine particles like smoke and bacteria, which creates a healthy environment in your home or office.<br/><br/><br/><b>User-Friendly Features </b><br/><br/>The MILAGROW vacuum cleaner affirms its reliability and safety for everyday use. Its user-friendly design allows for effortless operation and maintenance, which makes it an essential cleaning companion. With MILAGROW 9.0 Software Generation, it ensures optimal performance and user satisfaction.</b><br/><br/></p>
Post-processing plays a significant role in refining your star photos. Basic adjustments like reducing noise, enhancing star visibility, and tweaking contrast can transform an average shot into an awe-inspiring image. Tools such as Lightroom and Photoshop can be quite effective, as they allow for controlled editing of exposure and colour balance. Remember to approach post-processing as an extension of your original vision—subtle enhancements should serve to highlight the natural splendour of the night sky.
Use manual mode with a wide aperture such as f/2.8 or lower, moderate to high ISO (typically between 800 and 3200), and a shutter speed calculated using the 500 Rule to avoid star trails.
ISO settings usually range from 800 to 3200, depending on your camera’s capability and the ambient light conditions. Experimenting with different levels can help you achieve the desired balance between brightness and noise.
The 500 Rule involves dividing 500 by your lens’s focal length, which helps determine the longest shutter speed you can use without causing star trails in your photos.
For star photography, a wide-open aperture like f/2.8 or f/4 is ideal. This allows maximising the light intake during dusk or dawn, ensuring clear and bright star images.
In conclusion, mastering the core camera settings—ISO, aperture, and shutter speed—is essential for capturing breathtaking images of the night sky. Each setting plays a vital role in balancing the exposure and clarity of your images. Alongside, precise focus techniques and creative composition significantly enhance the overall impact of your photos. Star photography enthusiasts can also maximise their creative pursuits by earning NeuCoins on Tata Neu while purchasing top-notch camera gear. Embracing the art and science behind star photography allows you to unleash your creative potential, transforming challenging nights into moments of sheer beauty and inspiration. Explore these techniques, experiment with your camera, and let the night sky become your creative playground, one star at a time.
