Consumer Electronics
•04 min read

Buy Muvtech Crystal Pro Snap Hard Polycarbonate Back Case for Apple iPhone 15 Plus (Supports Wireless Charging, Black) online at best prices from Croma. Check product details, reviews & more. Shop now!
Protecting your smartphone's camera is not just about maintaining picture quality – it's about preserving the memories you capture every day. In this guide, we show you how to install an iphone camera lens protector easily, ensuring that your device stays shielded from dust, scratches, and accidental drops while enhancing your photography experience. With a focus on simplicity and effectiveness, you'll learn the step-by-step process and essential tips that make caring for your camera lens hassle-free.
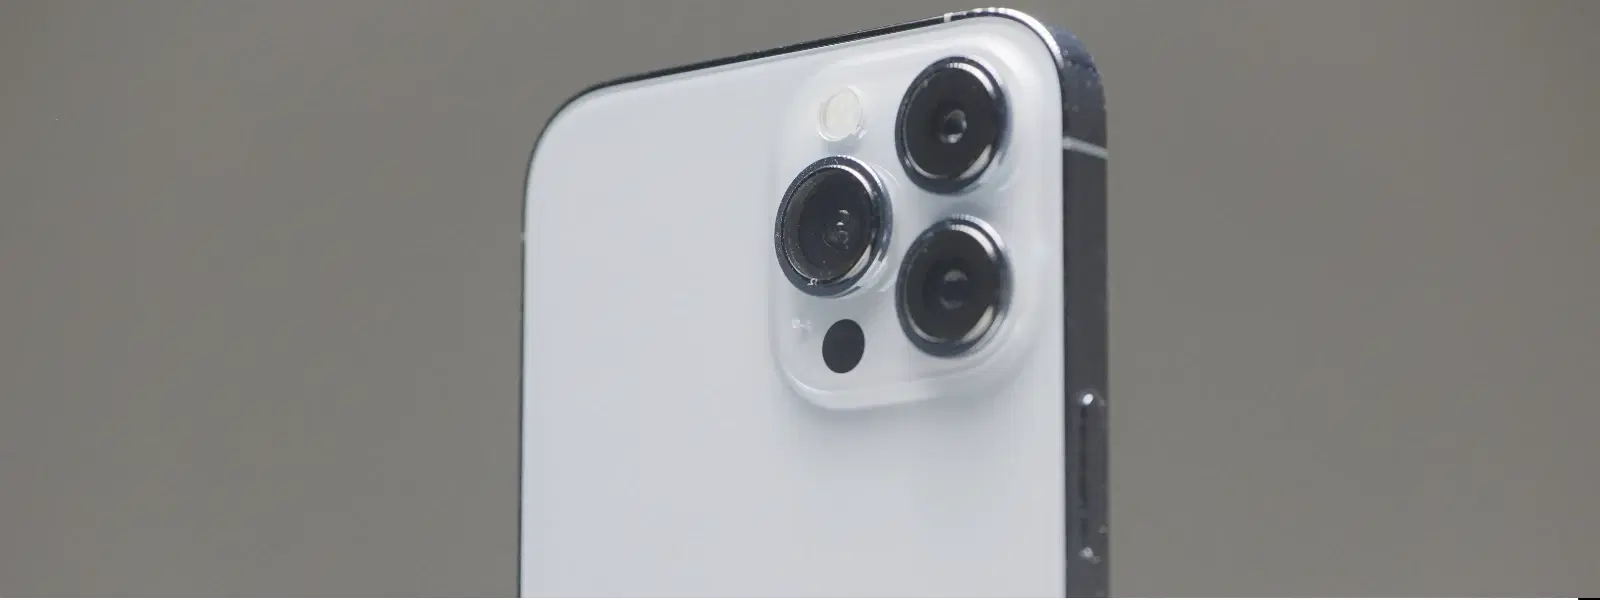
An iphone camera lens protector is a specially designed accessory that safeguards your camera lens from scratches and external damage. Often available as glass, plastic, or hybrid types, these protectors serve as a barrier between potential harm and your device’s delicate camera system. With options such as an iphone lens cover, camera lens shield, and protective lens cover, users have various choices according to their needs.
The advantages of installing a lens protector are plentiful. Firstly, it protects your camera against scratches and cracks, extending the longevity of your device. Additionally, by keeping the lens clean and clear, it ensures that the quality of your photos remains uncompromised. Whether it’s an iphone camera protector or a phone lens guard, these accessories are essential for preserving your device’s performance and aesthetic appeal.
There is a variety of lens protection for iphone available, including traditional glass protectors, plastic models, and innovative hybrids that combine the strengths of both materials. For instance, while an iphone lens protector offers a sleek look with enhanced clarity, a camera lens cover might provide extra resilience against impacts. Understanding the pros and cons of each will help you choose the best option tailored to your everyday needs.
Before you begin, prepare a clean workspace and ensure you have all the necessary tools: the lens protector, a high-quality cleaning cloth (preferably microfiber), a dust removal sticker, and an alignment tool if provided. Being well-prepared makes the installation process efficient and error-free.
Effective installation starts with a spotless camera lens. Begin by gently wiping the lens with a microfiber cloth to remove smudges and debris. Using a dust removal sticker can also help eliminate any residual dust particles. A clean surface not only ensures proper adhesion but also prevents trapped particles that could impair image quality.
Select a dust-free area with steady lighting and a stable surface for installation. Avoid places with high foot traffic or windy conditions, as these can introduce unwanted particulates onto the lens during the application process.

Buy ARROW Camera Duplex Screen Protector & Polycarbonate Back Cover Combo for SAMSUNG M11 (Anti Scratch Design, Black) online at best prices from Croma. Check product details, reviews & more. Shop now!
Open your package and check the contents. You should find the lens protector along with the cleaning cloth, dust removal sticker, and potentially an alignment tool. Ensure nothing is missing to avoid interruptions during installation.
Align the protector with your camera lens. If an alignment tool is provided, use it to ensure precision. Otherwise, carefully position the protector manually, checking that it lines up perfectly with the lens contour. A well-aligned protector is essential for optimal effectiveness and retains the clarity of your camera.
Once aligned, apply the lens protector slowly. Starting from one edge and gently pressing down can help prevent air bubbles from forming. If you notice bubbles during the process, gently use a soft cloth to push them outwards toward the edges.
After the protector is in place, inspect the installation carefully. Look for any bubbles, misalignment, or areas that might need repositioning. Making final adjustments is crucial to achieving a flawless application. If problems persist, consider reapplying the protector after removing any trapped dust or bubbles.
Pro Tip from Tata Neu
Always use a microfiber cloth to clean your iPhone camera lens before applying the protector. This ensures no dust particles get trapped, which can affect photo quality.
Keeping your lens protector in top condition requires gentle cleaning. Use a soft, lint-free cloth and, if needed, a small amount of lens cleaner to remove smudges without damaging the adhesive. Regular cleaning not only maintains clarity but also extends the life of your protector.
Adopt careful handling practices with your device; avoid contact with abrasive materials and keep your phone in a protective case when not in use. A little extra care goes a long way in preventing premature wear and tear on both the phone lens and its protector.
Over time, signs of wear such as persistent bubbles or scratches indicate it might be time for a new protector. Typically, if you notice significant damage or a decline in photo quality, consider replacing your lens protector approximately every 6-12 months, depending on your usage.

Buy scratchgard primo Tempered Glass for Apple iPhone 14 Pro Max (Precision Touch Sensitivity) online at best prices from Croma. Check product details, reviews & more. Shop now!
When choosing an iphone camera protector, consider factors like material type, durability, and ease of installation. High-quality options are available at trusted electronic and gadget stores, ensuring that your purchase is both durable and effective. Look for features such as anti-glare coatings and improved resistance against impacts.
An effective lens protector not only safeguards your camera but also boosts performance by keeping the lens clear of smudges. For tech enthusiasts and young professionals who invest in quality gadgetry, the right accessory can elevate everyday photography. Complement your protector with additional accessories like cases and filters designed to work in harmony with your device.
When shopping for an iphone camera lens protector, exploring trusted platforms that offer NeuCoin rewards and express delivery is beneficial. Platforms with reliable after-sales support ensure your gadget stays in perfect condition, and every purchase can also earn you rewards which can be redeemed across various categories, enhancing your overall shopping experience.
Gently press the bubbles towards the edges using a soft cloth or a card. If the bubbles persist, you may need to remove and reapply the protector.
Once removed, the adhesive properties are compromised, so the protector cannot be reused.
A high-quality lens protector, when properly applied, preserves photo quality. Ensure it is clean and correctly aligned to maintain clarity.
This depends on usage, but replacing it every 6-12 months or when wear is visible is recommended.
In summary, the protection of your device's camera lens is paramount in preserving its functionality and ensuring a high-quality photography experience. By understanding the types and benefits of lens protectors, preparing adequately for installation, and following simple maintenance steps, you can enjoy consistent performance from your smartphone camera. With clear instructions and useful tips such as using a microfiber cloth and selecting the right environment, the installation becomes a seamless task. As you invest in a reliable iphone camera lens protector, remember that smart shopping can also bring added benefits through rewards and faster delivery services. Explore and take advantage of these offerings to stay ahead in your tech game, ensuring your gadget remains as pristine as the moments it captures.
