Consumer Electronics
•05 min read

Have you ever struggled to transfer your cherished photos from your iPhone to your laptop? You’re not alone! In today’s digital age, preserving your memories is as important as capturing them. This comprehensive checklist is designed to help you effortlessly transfer photos from iPhone to laptop, whether you’re using a Windows computer or a Mac. By following these clear and easy steps, you’ll not only learn how to transfer photos from iPhone to computer but also gain insights on effective methods to move pictures from iPhone to laptop without the hassle.
Before you dive into the transfer process, a little preparation goes a long way. Start by ensuring your iPhone is ready for the move. Check that your iPhone is unlocked and that your laptop recognises it as a trusted device. It is also essential that your photos are easily accessible in the Photos app and not locked behind any restrictive iCloud settings. This initial step sets the foundation for a seamless experience.
Once you confirm your iPhone settings, decide on the connection method that suits you best. For those who appreciate the robustness of a physical link, a wired connection via a USB cable is ideal. Alternatively, if you lean towards cloud-based solutions, you could opt for wireless transfers using services such as iCloud or Google Photos. This choice directly influences how you sync iPhone photos to PC and the ease of exporting photos from iPhone to desktop.
Next, ensure you have the necessary software installed. For Windows users, installing iTunes might be required to have a smooth transition of photos, whereas Mac users should make sure that their macOS is up-to-date. This simple yet crucial step prevents compatibility issues later on and ensures your computer can effectively copy images from iPhone to Mac.
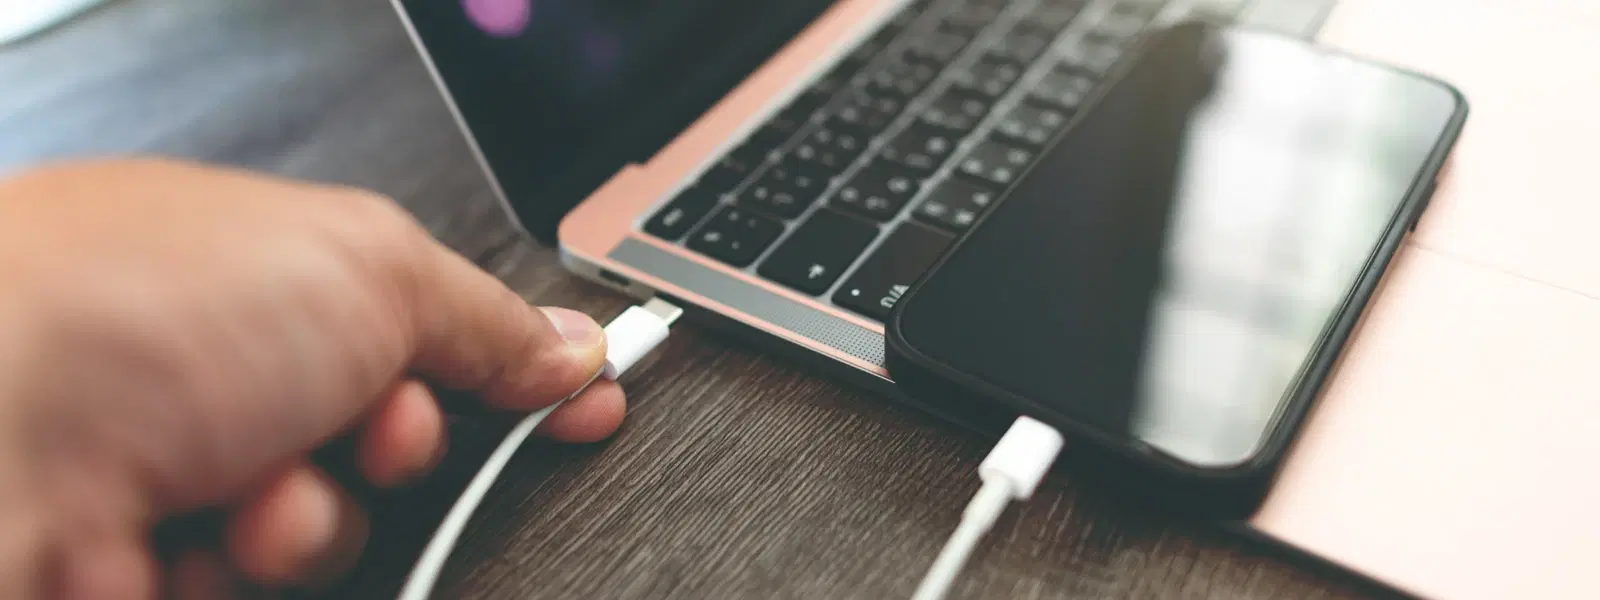
For those who prefer a direct and stable connection, wired methods are an excellent choice. Start by connecting your iPhone to your Windows laptop with a reliable USB cable. Open File Explorer and locate your device under the 'Devices' section. From there, you can easily drag and drop your images into your desired folder. This method lets you directly export photos from iPhone to desktop without any intermediaries.
If you are a Mac user, the process is equally straightforward. Connect your iPhone using a Lightning cable, open the Photos app on your Mac, and choose the 'Import' option. Once you’ve selected the images you want, simply click 'Import Selected' to copy them to your laptop. Remember, using a high-quality USB cable can significantly speed up the transfer process and reduce connection errors.
Pro Tip
Did you know? Using a high-quality USB cable can significantly speed up the transfer process and reduce connection errors!
Connect your iPhone to your Windows laptop using a USB cable, open File Explorer, locate your device, and then drag and drop your photos into your chosen folder.
Ensure your iPhone is unlocked and trusted by your laptop. Check the functionality of your USB cable and verify that any required software, such as iTunes for Windows, is up-to-date.
You can use wireless methods like iCloud Photos, Google Photos, or AirDrop if you are on a Mac. These options allow you to seamlessly transfer images without the need for cables.
After transferring your photos from your iPhone to your computer using your preferred method, copy the images to a connected USB drive for additional backup.
Understanding the process of how to transfer photos from iPhone to laptop can empower you to maintain a secure archive of your memories. This checklist guides you through each step—from initial preparation to troubleshooting common issues—ensuring that you can confidently export photos from iPhone to desktop. Whether you’re looking to quickly copy images from iPhone to Mac or need to transfer images from iPhone to Windows laptop, modern technology combined with simple, clear instructions makes this process accessible for everyone.
Tata Neu is committed to providing a seamless shopping experience that extends beyond purchasing gadgets and appliances. By offering rewards in the form of NeuCoins on every transaction, shipping express options, and expert guidance, Tata Neu continues to redefine how customers achieve their aspirations in technology and beyond. As you transition your memories from one device to another, remember that every step toward organised, hassle-free digital life is a step toward progress and simplicity in your day-to-day routine.
For those who prefer convenience and flexibility, wireless methods offer a perfect solution. One popular method is using iCloud Photos. Begin by enabling iCloud Photos on your iPhone, then on your laptop, access iCloud.com and download the photos you wish to have. This approach is particularly useful if you want to sync iPhone photos to PC without being tethered by cables.
Another great wireless option is the Google Photos app. Install Google Photos on your iPhone and let it sync your pictures automatically. Once the photos are uploaded, you will be able to access them via the web interface on your laptop. This method is ideal for those looking to download pictures from iPhone to laptop with minimal fuss.
If you are using a Mac, AirDrop presents an incredibly smooth alternative. Simply enable AirDrop on both your iPhone and Mac, select the photos you want to send, tap on the 'Share' option, and choose your Mac for a near-instant transfer. This service exemplifies how quickly you can transfer images from iPhone to Windows laptop or Mac without the need for cables.
Even with a well-prepared checklist, you might encounter a few hiccups along the way. If your laptop isn’t detecting your iPhone, ensure that the USB connection is secure and that the cable is fully functional. Sometimes, unplugging and re-plugging the cable or even restarting both your iPhone and computer can solve the issue. This simple troubleshooting step is often all that’s needed to reconnect a lagging device.
In cases where photos are not transferring completely, it’s a good idea to check a couple of things. Ensure your iPhone isn’t running low on storage, and verify that your iCloud sync settings or local photo library aren’t causing any restrictions. Additionally, confirming that your laptop possesses enough disk space is essential for a full and successful image transfer.
Wireless transfers might occasionally fail if there’s an unstable internet connection or if there is a misalignment between the devices. Always double-check that both your iPhone and laptop are signed into the same account if you are using cloud services, and affirm that your Wi-Fi connection is strong. These steps are critical to overcome obstacles when learning how to transfer photos from iPhone to laptop through wireless methods.
If the traditional wired or widely-known wireless methods aren’t meeting your needs, consider exploring alternative tools. Third-party apps such as Dropbox or OneDrive offer seamless photo syncing features. They create an additional layer of backup and provide flexibility if you need to transfer images instantly between devices.
Another useful method involves exporting photos via a USB connection to external storage. Once the images are safely copied to your laptop, transferring them to a USB drive or external hard disk becomes trivial. This alternative method is not only beneficial for photo transfer but also serves as an added backup strategy to safeguard your precious memories.

<p>Danger can overpower you at any time and your voice will not be enough in such situations to get the required aid. The amazing new <strong>Juvo PSB01 Personal Alarm</strong> is crafted for all ages and is a necessary precaution from all kinds of danger. It rings a very loud alarm at 120 dB as well as flashes the torch to warn people nearby about a danger. Whether you have a medical emergency or you are attacked by predators your voice may not be heard but this alarm will be enough to deter attackers or draw attention of people close by to give you the immediate assistance required.</p> <p><strong>Extremely Easy To Use</strong></p> <p>The <strong>Juvo PSB01 Personal Alarm</strong> is small and portable, can be attacked to even a keychain if you want. To start the siren all you need to do is separate or pull the metal key chain from the main black unit. The siren may go on for 1 1/2 hours in case nobody heard it in the first minutes. This is very important for girls returning home alone at night as it acts as a security anti-attack panic alarm that is sure to scare off a molester. Its easy portability accentuates its use.</p> <p><strong>Lights Your Way</strong></p> <p>The little and portable <strong>Juvo PSB01 Personal Alarm</strong> also features a small LED torch that helps you find your way in the dark. Don’t be scared of dark alleys when you have this with you because it is equipped to save you from all dangers.</p>

<p><strong>Effortless Performance</strong><br /> <br /> The sabichi Mono 24cm Whisk is designed for smooth and efficient whisking. Its polished stainless-steel wires and narrow shape ensure even blending and make it ideal for small bowls or containers. From whipping meringues to beating eggs, this whisk brings ease to every task.<br /> <br /> <br /> <strong>Versatile Whisking Tool</strong><br /> <br /> Whether you're blending batters, keeping lumps out of sauces, or creating airy meringues, this 24cm whisk is up to the challenge. It’s a kitchen essential that adapts to various culinary needs with precision and consistency.<br /> <br /> <br /> <strong>Safe for All Cookware</strong><br /> <br /> The whisk is gentle on all surfaces, including non-stick, ceramic, and metal cookware. You can whisk worry-free without scratching or damaging your kitchenware. This ensures long-lasting durability for your pots and pans.<br /> <br /> <br /> <strong>Ergonomic Design</strong><br /> <br /> Featuring an innovative handle with a soft, comfortable grip, this whisk absorbs pressure for strain-free usage. Its contoured shape ensures a secure hold, even during prolonged whisking tasks, for an effortless cooking experience.<br /> <br /> <br /> <strong>Convenient Storage</strong><br /> <br /> Equipped with a handy hanging loop, the whisk offers easy storage. It’s always within reach while saving counter and drawer space, making it as practical as it is efficient.</p>

<b>Why Buy Environics Device Disinfector</b><ul><li><b></b> for optimised disinfection</li><li><b></b> makes sure all the germs are killed</li></ul><p>To prevent harmful bacteria and fungi from getting in contact with you, buy <b>Environics Device Disinfector</b>. The usability of your device disinfector may be affected if its installation is complex. As this device disinfector has the it prevents the extra-spill and wastage of sanitizer. Your residence and office will stay clean and hygienic with products from this device disinfector that have 99.99% high resistance against germs and viruses. </p><p>The <b>Environics Device Disinfector's</b> price is cost-effective so you don't have to adjust your budget. The longer it takes for the device disinfector to disinfect, the longer you will have to wait. As a result of its efficient and effective operation, this device disinfector requires only to inject. Your device disinfector needs to have the latest technology to make sure it kills all the germs. As this device disinfector has the to prevent viruses, you can rest assured. Purchase the <b>Environics Device Disinfector</b> online at this instant!</p>