Consumer Electronics
•04 min read

Buy SAMSUNG Screen Protector for SAMSUNG Galaxy Z Flip7 (Anti-reflecting Film) online at best prices from Croma. Check product details, reviews & more. Shop now!
Imagine spending time carefully applying a new screen protector, only to see pesky air bubbles marring the sleek look of your phone display. Air bubbles under screen protectors are a common frustration, but they are not impossible to fix. In this guide, we provide a step-by-step checklist to remove air bubbles from your screen protector effectively. By following these clear and simple instructions, you will learn how to troubleshoot and even prevent bubbles from forming on your phone or tablet screen.
The appearance of bubbles is usually due to dust, dirt, or debris trapped during installation. Sometimes, an uneven application or misalignment is to blame. Additionally, temperature changes can cause the protector’s adhesive to slightly expand or contract, which may trap air beneath it.
When you inspect your screen, you may notice different forms of bubbles. There can be small, scattered bubbles that appear all over the display, larger stubborn bubbles that linger, or edge bubbles that form due to poor adhesion. Understanding these differences can help when you try to fix air bubbles on screen protector.
The first step to apply a screen protector without bubbles is ensuring your phone screen is scrupulously clean. Use a microfiber cloth along with an alcohol-based cleaner to remove all prints, smudges, and dust. Avoid tissues or paper towels as they can leave fibers behind, which may cause bubbles under screen protector later.
Select a dust-free, well-lit space for application. Avoid humid or windy conditions that could introduce extra particles during the installation process. This environment can help you eliminate air bubbles on screen protector and ensure a neat finish.
Take your time to line up the protector with the edges of your phone. Use guide stickers or alignment tools if provided. Proper alignment is key to apply screen protector without bubbles and to reduce the need for bubble removal later.

<p>Danger can overpower you at any time and your voice will not be enough in such situations to get the required aid. The amazing new <strong>Juvo PSB01 Personal Alarm</strong> is crafted for all ages and is a necessary precaution from all kinds of danger. It rings a very loud alarm at 120 dB as well as flashes the torch to warn people nearby about a danger. Whether you have a medical emergency or you are attacked by predators your voice may not be heard but this alarm will be enough to deter attackers or draw attention of people close by to give you the immediate assistance required.</p> <p><strong>Extremely Easy To Use</strong></p> <p>The <strong>Juvo PSB01 Personal Alarm</strong> is small and portable, can be attacked to even a keychain if you want. To start the siren all you need to do is separate or pull the metal key chain from the main black unit. The siren may go on for 1 1/2 hours in case nobody heard it in the first minutes. This is very important for girls returning home alone at night as it acts as a security anti-attack panic alarm that is sure to scare off a molester. Its easy portability accentuates its use.</p> <p><strong>Lights Your Way</strong></p> <p>The little and portable <strong>Juvo PSB01 Personal Alarm</strong> also features a small LED torch that helps you find your way in the dark. Don’t be scared of dark alleys when you have this with you because it is equipped to save you from all dangers.</p>
Use your fingers or a soft cloth held against the surface to gently press and push the bubbles outward toward the edges. This simple step works well for small, scattered bubbles.
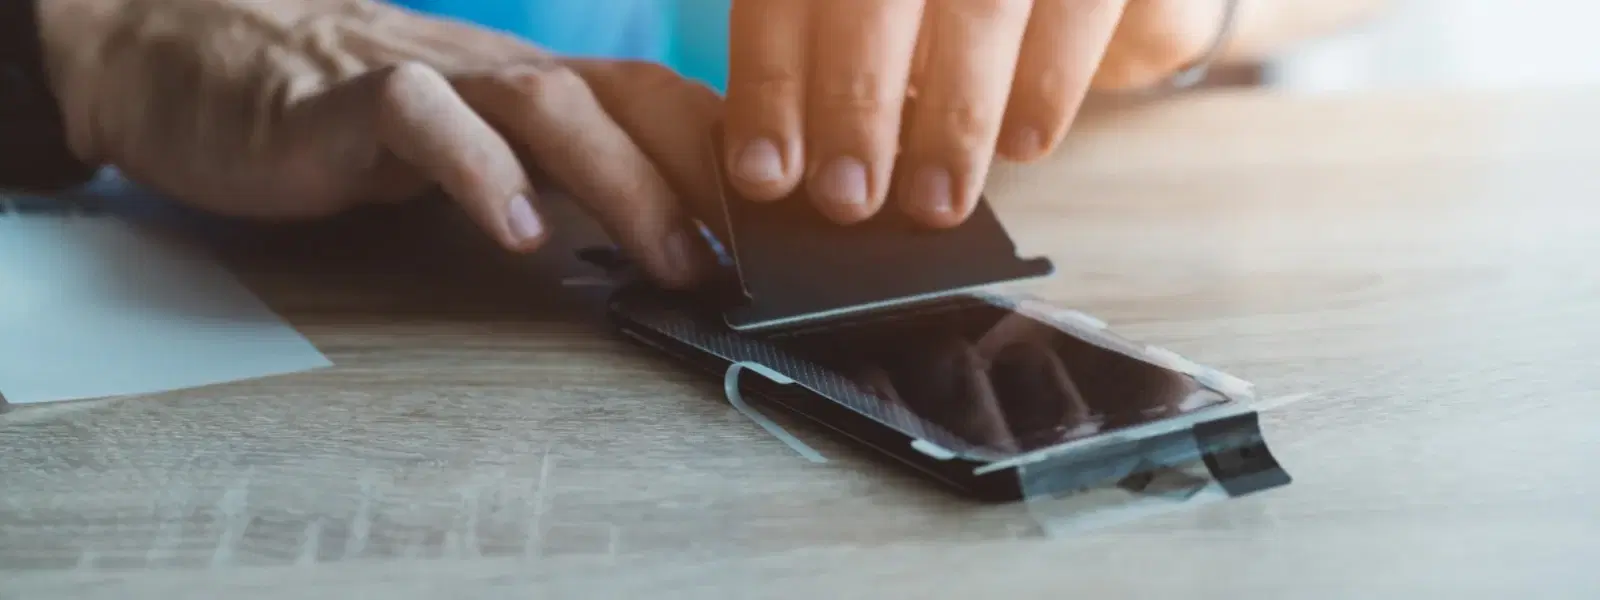
A wrapped credit card in a soft cloth can be very effective. Use it to press bubbles out evenly. This is a common screen protector bubble removal tip and helps you move air from stubborn bubbles without causing damage or scratches.
If you still see bubbles, carefully lift the edge of the screen protector near the affected area. Reapply the protector, smoothing out the area to get rid of trapped air. This method can be particularly useful if you wish to fix air bubbles on screen protector quickly and effectively.
Sometimes, a little warmth can help. Use a hairdryer on a low heat setting to gently warm the screen protector. The slight heat softens the adhesive and allows you to smooth out any remaining bubbles with ease. Always be cautious to avoid excessive heat.
Pro Tip: "Avoid air bubbles by applying the screen protector in a steamy bathroom. The steam reduces airborne dust particles, creating a cleaner environment for installation."
If bubbles are still visible after your first attempt, consider removing and reapplying the screen protector entirely. It might also be worth checking if the protector has any manufacturing defects that could be causing the issue.
When dealing with edge bubbles, apply light pressure with a plastic card or even a very small drop of oil to help improve adhesion. For older bubbles that appear after prolonged use, inspect for any dirt or damage that may have occurred under the screen protector, and clean or reapply accordingly.

<b>Why Buy Environics Device Disinfector</b><ul><li><b></b> for optimised disinfection</li><li><b></b> makes sure all the germs are killed</li></ul><p>To prevent harmful bacteria and fungi from getting in contact with you, buy <b>Environics Device Disinfector</b>. The usability of your device disinfector may be affected if its installation is complex. As this device disinfector has the it prevents the extra-spill and wastage of sanitizer. Your residence and office will stay clean and hygienic with products from this device disinfector that have 99.99% high resistance against germs and viruses. </p><p>The <b>Environics Device Disinfector's</b> price is cost-effective so you don't have to adjust your budget. The longer it takes for the device disinfector to disinfect, the longer you will have to wait. As a result of its efficient and effective operation, this device disinfector requires only to inject. Your device disinfector needs to have the latest technology to make sure it kills all the germs. As this device disinfector has the to prevent viruses, you can rest assured. Purchase the <b>Environics Device Disinfector</b> online at this instant!</p>
Always make sure your phone is clean before applying any new screen protector. Using a high-quality protector with strong adhesive properties is recommended, as it tends to smooth out screen protector bubbles and reduces the likelihood of needing to remove bubbles later. Taking the proper precautions during initial installation leads to a longer lasting and neater application.
Over time, dust and debris can still find their way onto your screen protector, often around the edges. To avoid this, periodically check your device and clean around the borders if needed. Furthermore, try to keep your phone away from extreme temperatures to maintain the adhesive’s effectiveness. This unknown advantage mirrors the smart shopping experience on Tata Neu, where every detail is about value and trust. Savvy shoppers not only enjoy top tech features but also earn NeuCoins on every purchase, making every transaction a step towards even greater rewards.
Use a plastic card wrapped in a soft cloth to gently press the bubbles outward toward the edges.
Small bubbles may settle as the adhesive sets; however, larger bubbles typically require manual intervention.
Yes, applying low heat with a hairdryer can soften the adhesive, making it easier to press out bubbles.
Apply gentle pressure with a plastic card or use a small drop of oil to improve adhesion at the edges.
Yes, bubbles can form later due to temperature changes, dust intrusion, or adhesive degradation over time.
Air bubbles under screen protectors can be frustrating, but with the right techniques, they are entirely fixable. By following this checklist, you can remove bubbles efficiently and prevent them from forming again. This simple process not only keeps your screen looking clear and pristine but also reflects the smart, thoughtful approach that defines the Tata Neu experience. Enjoy the convenience, rewards, and benefits such as earning NeuCoins on each purchase, enhancing your journey towards a more connected and streamlined lifestyle.
