Home Appliances
•04 min read
(63)-c5fe0bca-9213-4d7b-9b08-9b71581895d4.png&w=3840&q=75)
Did you know that a roof exhaust fan can drastically improve your home's air circulation and energy efficiency? Installing one not only promotes optimal attic ventilation but also reduces moisture buildup and contributes to a more comfortable indoor environment. In this guide, you'll learn a step-by-step process to install a roof-mounted exhaust system with ease, ensuring improved airflow and enhanced energy savings.
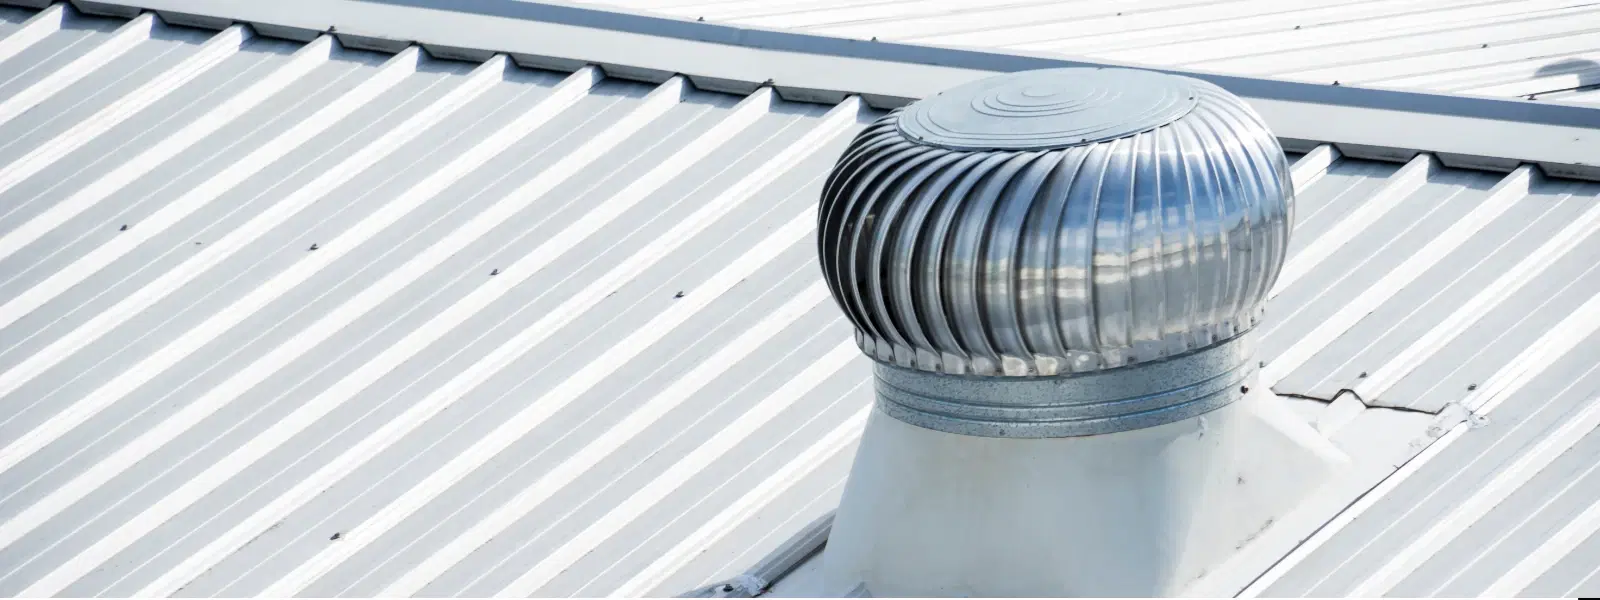
A roof exhaust fan is designed to extract hot, stale air from your attic or upper areas of your home. By promoting better circulation, it helps keep indoor spaces cooler and more comfortable, especially during warmer months. These systems can be a vital component of home ventilation solutions, offering benefits like reduced moisture retention and improved overall energy efficiency.
When considering a roof exhaust fan, you might encounter various types such as electric and solar-powered units. Electric fans are widely used due to their consistent performance, while solar-powered roof fans harness renewable energy for a cost-effective solution. Additionally, models labelled as quiet exhaust fans are perfect for areas where noise is a concern. Energy-efficient exhaust fans are increasingly popular as they lower power consumption, making them an appealing choice for many households.
Before you start your roof fan installation, it’s essential to select a model that fits your needs. Consider factors like the size of your space, whether you prefer an electric or solar-powered roof fan, and how compatible the unit is with your roof type. With options like an attic ventilation fan and even a ceiling exhaust fan available, assessing these features will help ensure you choose a system that offers maximum benefits.
Gather essential tools before beginning the installation. Typically, you will need a drill, screws, caulk, measuring tape, ladder, and safety gear. It’s also advisable to invest in weather-resistant and UV-resistant materials to guarantee that your installation can endure diverse weather conditions. Keeping your workspace organized will facilitate a smooth and hassle-free setup process.
Safety should always be your foremost consideration. Always wear safety gear and ensure your ladder is stable before climbing onto the roof. Taking time to check that all your tools are in working order minimizes the risk of accidents. Ensuring a safe working environment is the best way to guarantee a successful roof fan installation without any setbacks.
(62)-2400b85f-37c9-45ca-ba90-0062b98a389e.png&w=3840&q=75)
Start by identifying the ideal location for your roof exhaust fan. Use a measuring tape to find the central point where maximum airflow is achievable. Mark the area clearly; this will serve as your guide for cutting the vent hole and centre the unit perfectly on your roof.
With the area marked, it’s time to create an opening. Use appropriate tools to carefully cut a hole that matches the dimensions of your fan’s housing. Remember to take precautions to avoid any structural damage to the roof. Ensuring a snug fit is essential for the performance of the roof-mounted exhaust system, as a tight installation will prevent leakages and other issues.
Align your roof exhaust fan with the pre-cut vent hole. Secure the unit firmly using screws and ensure that all edges are sealed with caulk. This step is critical as an improper seal might lead to leaks that could jeopardize energy efficiency. Following these guidelines will help you achieve a robust and reliable installation.
With the fan securely installed, the next step is wiring. If you are using an electric unit, connect it carefully to your home’s electrical system. For solar-powered roof fans, ensure that the wiring is compatible with your solar panel setup. Once completed, test the fan thoroughly to confirm that it operates efficiently and quietly. This final step verifies that your home ventilation solution is fully operational.
Expert Tip: Maximise Your Roof Fan’s Efficiency
Pairing your roof fan with proper attic insulation can dramatically boost its performance and overall energy efficiency. Insulation stabilises indoor temperatures, assisting your exhaust system in managing airflow with less strain, thereby ultimately reducing energy costs.
Maintaining your roof exhaust fan is key to its longevity. Experts recommend regular inspections to check for any wear and tear. A periodic review helps in identifying issues before they escalate into major problems, safeguarding your investment over time.
-2b880b8d-429c-416a-8559-c2de7c8d7052.png&w=3840&q=75)
Keep your roof-mounted exhaust system in top condition by cleaning the fan blades and vents routinely. Regular cleaning not only maintains optimal performance but also extends the lifespan of the unit. This means fewer disruptions and sustained efficiency in air circulation.
If you experience issues like unexpected leaks or noise during operation, it’s important to troubleshoot promptly. Often, leaks can be attributed to improper sealing or worn-out flashing. Reapplying caulk or replacing the damaged components can resolve these issues effectively. In many cases, minor adjustments will restore your system’s performance to optimal levels.
Yes, roof exhaust fans are highly beneficial as they offer substantial improvements in air circulation, contributing to a more energy-efficient and comfortable living environment.
The most effective ventilation system integrates both passive and active solutions. Combining systems such as ridge vents with a roof-mounted exhaust system maximises airflow and ensures efficient temperature control.
Leaks are commonly due to improperly sealed edges or damaged flashing. Reapplying a quality caulk and checking the integrity of the flashing can prevent water intrusion during heavy rains.
Implementing a roof ventilation fan in your home is a smart investment towards a healthier and more energy-efficient living space. Not only does it aid in maintaining balanced indoor temperatures, but it also assists in reducing the overall energy consumption. With the ease of installation and the potential to earn NeuCoins through smart purchases on platforms like Tata Neu, you're not merely upgrading your home but also earning rewards along the way. Enjoy the benefits of express delivery and unmatched after-sales support, ensuring that every upgrade continues to deliver value well into the future.
By following this step-by-step guide, you’re well on your way to installing a reliable and efficient roof exhaust fan. The process covers everything from the importance of proper installation to long-term maintenance tips, ensuring that your investment delivers consistent performance. For those looking to benefit from faster delivery and expert guidance, it’s worth considering solutions that offer the added advantage of NeuCoin rewards. This comprehensive approach to home ventilation ensures not only greater comfort but also smarter, more effective household management.
